Java Tutorial

  • API Gateway vs Load Balancer – A Complete Guide

    When building scalable and reliable applications, especially in microservices and cloud-native architectures, two terms often come up: API Gateway and Load Balancer.

    At first glance, they may seem similar since both sit between the client and backend services. However, they solve different problems and often work together in modern systems.

    In this tutorial, we’ll break down the differences, use cases, advantages, and limitations of each.

    🔹 What is an API Gateway?

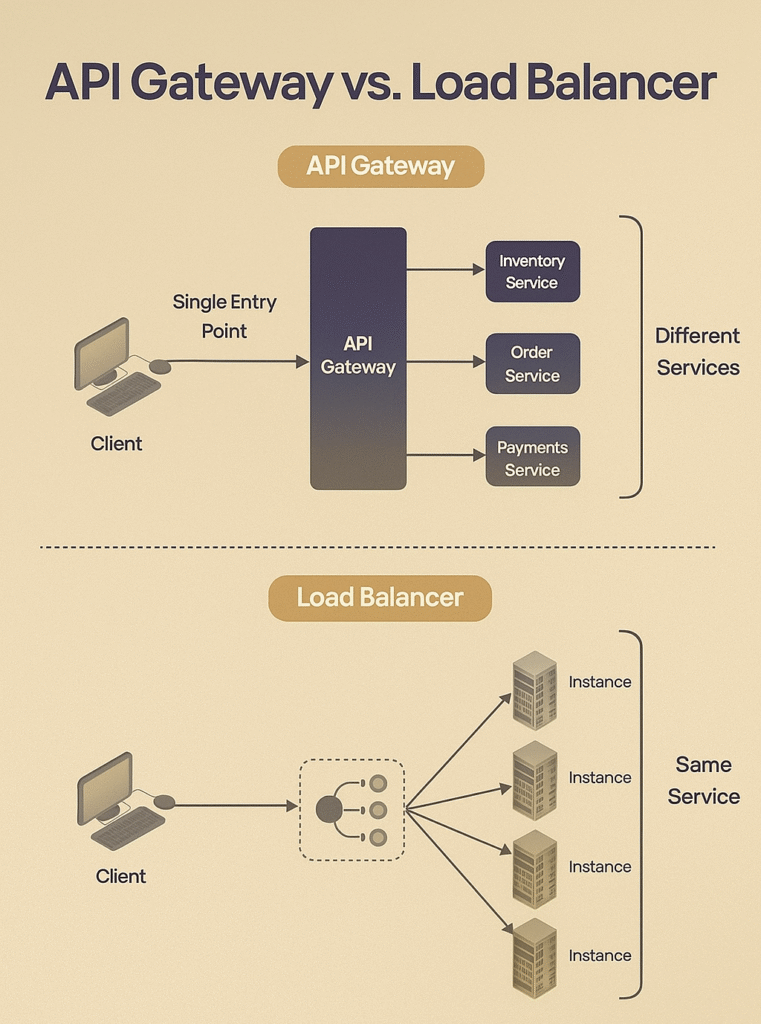
    An API Gateway is the single entry point for all client requests in a microservices architecture.
    Instead of allowing clients to directly call each microservice, the gateway acts as a centralized layer that manages, secures, and routes traffic.

    It acts like a “smart postman”—receiving requests, verifying them, and routing them to the appropriate microservice.

    🔹 Why Do We Need an API Gateway?

    1. Simplifies Client Interaction
      • Clients don’t need to know about individual microservices.
      • Instead of calling /users-service, /orders-service, /payments-service, clients just call /api, and the Gateway routes internally.
    2. Centralized Security
      • Authentication, authorization, and encryption policies are applied at one place.
      • Prevents exposing every service directly to the internet.
    3. Decoupling Client from Backend
      • If microservice endpoints or versions change, only the Gateway updates.
      • Clients continue using the same unified API.
    4. Cross-Cutting Concerns
      • Logging, monitoring, caching, and throttling are all handled centrally.

    🔹 Key Features of an API Gateway

    1. Routing
      • Decides which microservice should handle a request.
      • Example: /api/orders → Order Service, /api/payments → Payment Service.
    2. Authentication & Authorization
      • Validates user credentials (API keys, JWT, OAuth tokens).
      • Ensures only authorized clients access protected services.
    3. Rate Limiting / Quota Management
      • Prevents abuse and DDoS attacks by limiting requests per client or per second.
      • Example: Free tier users → 1000 requests/day; Premium users → Unlimited.
    4. Load Balancing
      • Distributes traffic among multiple instances of a microservice.
      • Example: If the Payment Service runs on 3 servers, the Gateway balances requests.
    5. Response Caching
      • Stores frequent responses (e.g., top products list) to reduce backend load.
    6. Protocol Translation
      • Converts requests and responses between protocols: REST ↔ gRPC, REST ↔ SOAP, HTTP ↔ WebSocket.
    7. Logging & Monitoring
      • Tracks request/response metrics, latency, error rates, etc., for observability.

    🔹 Pros & Cons of API Gateway

    ✅ Pros

    • Simplified Client API – Clients talk to one endpoint.
    • Centralized Security – Uniform authentication and access control.
    • Supports Microservices – Decouples clients from backend complexity.
    • Cross-Cutting Services – Logging, rate limiting, caching, monitoring.

    ❌ Cons

    • Maintenance Overhead – Needs constant tuning and scaling.
    • Single Point of Failure – If the gateway fails, all requests fail.
    • Increased Complexity – More moving parts to maintain.
    • Performance Bottleneck – Adds an extra network hop.

    🖼 Example:

    A client calls /orders, the API Gateway authenticates the request, checks rate limits, and then routes it to the Order Service.

    🔹 What is a Load Balancer?

    A Load Balancer is a networking component that sits between the client and the server pool. Its main role is to distribute incoming traffic across multiple servers that provide the same service.

    Without a Load Balancer, a single server may become overwhelmed when too many requests arrive simultaneously. With a Load Balancer, traffic is intelligently divided, ensuring:

    • Performance → users experience faster and more consistent response times
    • Scalability → more servers can be added to handle more traffic.
    • Availability → if one server fails, traffic is redirected to healthy servers.

    📌 Key Analogy:
    Think of a ticket counter at a movie theatre. Instead of everyone lining up at one counter, multiple counters are available. A supervisor (the Load Balancer) directs each new customer to the counter with the shortest line.

    🔹 Why Do We Need a Load Balancer?

    1. Prevent Overloading → No single server is overwhelmed.
    2. Improve User Experience → Faster response times due to balanced load.
    3. Enable Horizontal Scaling → Easily add/remove servers without downtime.
    4. Fault Tolerance → If one server crashes, requests go to healthy servers.
    5. Disaster Recovery → Can route traffic to a backup data center if the primary fails.

    🔹 How Load Balancers Work:

    • Client Request → A user sends a request (e.g., open a website).
    • Load Balancer Receives It → Instead of hitting a single server, the request first arrives at the Load Balancer.
    • Health Check → The Load Balancer checks which servers are healthy and available.
    • Routing Decision → It applies an algorithm (e.g., Round Robin, Least Connections) to choose a server.
    • Forwarding Request → The request is forwarded to the chosen server.
    • Response Back → The server processes the request and sends the response back to the client (sometimes directly, sometimes via the Load Balancer).

    🔄 Load Balancing Algorithms:

    • Round Robin: Requests are distributed sequentially.
    • Least Connections: Sends traffic to the server with the fewest active connections.
    • IP Hash: Routes requests based on client IP.
    • Least Response Time: Sends traffic to the fastest responding server.

    ✅ 🔹 Advantages of Load Balancers

    • Scalability – Easily add/remove servers without downtime.
    • High Availability – Routes traffic only to healthy servers.
    • Fault Tolerance – Handles failures automatically.
    • Efficient Resource Use – Ensures no server is idle while others are overloaded
    • Increases scalability and ensures high availability.
    • Efficiently utilizes server resources.
    • Provides fault tolerance.

    🔹 Limitations of Load Balancers

    • Single Point of Failure (if not configured in redundancy mode).
    • Extra Latency – Requests pass through an additional network hop.
    • Complexity – Requires careful configuration and monitoring.
    • Cost – Managed Load Balancers (AWS/GCP/Azure) add billing overhead.

    🔹 Types of Load Balancers

    Load Balancers can operate at different layers of the OSI model:

    1. L4 Load Balancer (Transport Layer)
      • Routes based on IP address & Port.
      • Does not inspect the actual content of the request.
      • Example: AWS Network Load Balancer (NLB), HAProxy in L4 mode.
      • Best for: TCP/UDP traffic (gaming servers, video streaming).
    2. L7 Load Balancer (Application Layer)
      • Routes based on application-level data (HTTP headers, URLs, cookies).
      • Can make smart decisions like sending /images requests to one server and /api requests to another.
      • Example: AWS Application Load Balancer (ALB), Nginx, Envoy.
      • Best for: Web applications & microservices.
    3. DNS-Based Load Balancer
      • Distributes requests by resolving DNS to different server IPs.
      • Example: AWS Route 53, Cloudflare Load Balancer.
      • Best for: Global traffic routing across multiple regions.

    🔹 API Gateway vs Load Balancer – Key Differences

    FeatureAPI Gateway 📨Load Balancer ⚖️
    PurposeRoutes to different servicesRoutes to same service instances
    ScopeMicroservices managementTraffic distribution
    FunctionsAuth, rate limiting, caching, loggingRouting, health checks, fault tolerance
    LayerApplication (L7)Network (L4) or Application (L7)
    ExampleKong, Apigee, AWS API GatewayNginx, HAProxy, AWS ALB/NLB

    🔹 When to Use Which?

    Choosing between an API Gateway and a Load Balancer depends on the architecture, goals, and type of application you’re building. Let’s explore both in detail:

    ✅ Use API Gateway If:

    1. You are building a Microservices Architecture
      • In a microservices setup, exposing each microservice (Order, Payment, Inventory, etc.) directly to clients is inefficient and insecure.
      • An API Gateway provides a single unified entry point so clients don’t need to know the internal microservice structure.
      • Example: In an e-commerce platform, the client just calls /checkout, while the API Gateway internally routes requests to the Order Service, Payment Service, and Inventory Service.
    2. You need Authentication & Security
      • Clients shouldn’t directly handle tokens or authentication with every microservice.
      • The API Gateway centralizes JWT validation, OAuth, API keys, and enforces security policies before forwarding requests.
      • Example: In a banking app, the API Gateway validates customer tokens and ensures only authorized requests reach the Accounts Service or Transactions Service.
    3. You need Rate Limiting or Quota Management
      • To prevent abuse (like DDoS or excessive API calls), the API Gateway enforces rate limits per client or per API key.
      • Example: In a SaaS product, the free tier is limited to 1000 requests/day, while the premium tier gets unlimited access—this is managed at the API Gateway level.
    4. You want Protocol Translation
      • Sometimes clients speak REST, but services run on gRPC, SOAP, or WebSockets.
      • The API Gateway converts requests/responses between protocols.
      • Example: A mobile app communicates over REST, while backend services talk over gRPC—the gateway handles translation.
    5. You want Response Caching & Performance Optimization
      • Frequently accessed results (e.g., top products list) can be cached at the gateway to reduce latency.
      • Example: An online news platform caches the latest headlines at the API Gateway, avoiding repeated calls to backend services.

    ✅ Use Load Balancer If:

    1. You want to Scale Your Application Horizontally
      • When a single server can’t handle all requests, multiple identical instances are deployed.
      • The Load Balancer spreads traffic across them.
      • Example: A social media app runs 50 web servers behind a Load Balancer—so millions of users can be served seamlessly.
    2. You need High Availability & Fault Tolerance
      • Load Balancers perform health checks and stop sending traffic to failed servers.
      • If one instance crashes, the Load Balancer routes traffic only to healthy ones.
      • Example: In a video streaming platform, if one server goes down, the Load Balancer instantly redirects users to working servers—ensuring no downtime.
    3. You want Efficient Resource Utilization
      • Load Balancers use algorithms (Round Robin, Least Connections, IP Hash) to evenly distribute requests.
      • This ensures no server is overloaded while others remain idle.
      • Example: An online exam portal during peak hours balances load across multiple servers so no single node slows down.
    4. You want Global Traffic Management
      • Some load balancers work at DNS level (e.g., AWS Route 53, Cloudflare Load Balancer) to direct users to the nearest or healthiest region.
      • Example: A global e-commerce site sends US users to US servers, EU users to EU servers—minimizing latency.
    5. You want to Enhance Network Performance
      • Load Balancers (especially L7) can do SSL termination, request compression, and even Web Application Firewall (WAF) integration.
      • Example: In a fintech app, SSL termination at the Load Balancer reduces encryption load on backend servers.
    🔹 Putting It Together

    • API Gateway = Smart traffic controller for different services
      👉 Ideal for microservices, authentication, caching, protocol translation.
    • Load Balancer = Simple traffic distributor for same service instances
      👉 Ideal for scaling, availability, resource efficiency.

    📌 Best Practice: In most enterprise systems, you’ll use both together.

    • The Load Balancer ensures requests are spread evenly across multiple server instances.
    • The API Gateway ensures requests are secure, authenticated, and routed to the correct microservice.

    💡 Example: Netflix Architecture

    • API Gateway (Zuul, now Zuul 2 / Spring Cloud Gateway) → Handles routing, security, throttling.
    • Load Balancer (Ribbon + AWS ELB) → Ensures millions of users are distributed across multiple backend servers efficiently.

    📝 Conclusion

    • An API Gateway is about managing APIs and microservices.
    • A Load Balancer is about distributing traffic and ensuring availability.

    Together, they form the backbone of modern cloud-native, microservices-driven architectures.

    Final Takeaway

    • Use an API Gateway when you have multiple microservices and need a single entry point with security and routing.
    • Use a Load Balancer when you have multiple instances of the same service and need scaling and high availability.
    • In real-world enterprise systems → They complement each other for a robust, secure, and scalable architecture.
  • Arrays in Java -Complete Guide with Examples

    1. Introduction to Arrays in Java

    What is an Array?

    In Java, an array is a data structure that allows us to store multiple values of the same type in a single variable. Instead of declaring separate variables for each value, we can group them together into a single collection.

    For example:

    int rollNo1 = 101;
    int rollNo2 = 102;
    int rollNo3 = 103;

    Here, we had to create 3 different variables. If you want to store 100 student roll numbers, creating 100 variables is impractical.

    That’s where arrays come in.

    👉 An array can store all the roll numbers in one single variable:

    int[] rollNumbers = {101, 102, 103};

    Why Do We Need Arrays?

    1. Efficiency – Instead of declaring many variables, we can use one array.
    2. Structured Data Handling – Arrays allow us to loop through values, search, and manipulate them.
    3. Memory Management – Values are stored in contiguous memory locations, making access faster using indices.
    4. Scalability – Easy to manage large data sets compared to handling multiple variables.

    Formal Definition

    An array in Java is a container object that holds a fixed number of values of a single data type. The length of an array is established when the array is created. After creation, its length is fixed and cannot be changed.

    Syntax of Arrays

    There are two steps in using arrays:

    1. Declaration – Telling Java that you want an array of a specific type.
    2. Instantiation – Allocating memory for the array.
    3. Initialization – Assigning values to array elements.

    Example 1: Separate steps

    int[] numbers;          // declaration
    numbers = new int[5];   // instantiation (array of size 5)
    numbers[0] = 10;        // initialization
    numbers[1] = 20;

    Example 2: Combined declaration & instantiation

    int[] numbers = new int[5];

    Example 3: Declaration + Instantiation + Initialization

    int[] numbers = {10, 20, 30, 40, 50};

    Accessing Array Elements

    Each element of the array is accessed by its index, starting from 0.

    System.out.println(numbers[0]); // prints 10
    System.out.println(numbers[2]); // prints 30

    Memory Allocation of Arrays in Java

    When an array is created, Java allocates a contiguous block of memory to store its elements.

    • Each element is stored sequentially in memory.
    • The index acts as an offset to calculate the memory address.
    • Formula: Address of arr[i] = Base Address + (i × Size of each element)

    Diagram: 1D Array Memory Representation

    Suppose we have:

    int[] numbers = {10, 20, 30, 40, 50};
    

    Memory Layout:

    Index   →   0     1     2     3     4
    Value   →  10    20    30    40    50
    Address → 1000  1004  1008  1012  1016   (if int = 4 bytes)
    

    📌 All values are stored sequentially (continuous block).
    📌 Fast access: e.g., to access numbers[3], JVM directly jumps to 1000 + (3 × 4) = 1012.

      2. Types of Arrays

      1. Single-Dimensional Arrays
        • int[] arr = {10, 20, 30};
      2. Multi-Dimensional Arrays
        • int[][] matrix = {
          {1, 2, 3},
          {4, 5, 6}
          };
      3. Jagged Arrays (array of arrays with different lengths)
        • int[][] jagged = new int[2][];
          jagged[0] = new int[3]; // row 1 → 3 elements
          jagged[1] = new int[2]; // row 2 → 2 elements

      3. Operations on Arrays

      Arrays are simple but powerful. Common array operations you’ll explain in your blog are: traversing, searching, sorting, copying, and insert/delete (resize-like operations). Below each operation I show why it’s done that way, how to do it in Java, the cost (big-O), and common pitfalls.

      Examples:

      int[][] jagged = new int[2][];
      jagged[0] = new int[3]; // row 1 → 3 elements
      jagged[1] = new int[2]; // row 2 → 2 elements

      3.1) Iterating

      Methods

      1. classic for-loop — when you need the index (read/write by index):
      int[] arr = {10, 20, 30, 40};
      for (int i = 0; i < arr.length; i++) {
          System.out.println("index=" + i + " value=" + arr[i]);
          // you can update: arr[i] = arr[i] + 1;
      }
      
      1. enhanced for-loop (for-each) — simpler when you only need values:
      for (int value : arr) {
          System.out.println(value);
      }

      Use for-each for readability; you can’t change the array slot with the loop variable (it’s a copy for primitives).

      1. while / do-while — same as for but sometimes clearer with external index:
      int i = 0;
      while (i < arr.length) {
          System.out.println(arr[i++]);
      }
      1. Streams (Java 8+) — concise functional style (good for mapping, filtering, aggregation):
      import java.util.Arrays;
      
      int[] arr = {1, 2, 3, 4, 5};
      Arrays.stream(arr).forEach(System.out::println);
      
      // example: sum of elements > 2
      int sum = Arrays.stream(arr)
                      .filter(x -> x > 2)
                      .sum();
      System.out.println(sum); // 12

      Complexity

      • Traversal cost: O(n) where n = arr.length.

      When to use which

      • Need index → classic for or while.
      • Just values → enhanced for.
      • Aggregation/filtering → Streams.

      3.2) Searching

      Two typical searches: linear search and binary search.

      Linear Search

      • Scans elements one-by-one.
      • Works on unsorted arrays.

      Code:

      public static int linearSearch(int[] arr, int target) {
          for (int i = 0; i < arr.length; i++) {
              if (arr[i] == target) return i; // found index
          }
          return -1; // not found
      }

      Example:

      int[] arr = {5, 3, 8, 1};
      System.out.println(linearSearch(arr, 8)); // 2
      System.out.println(linearSearch(arr, 7)); // -1

      Complexity:

      • Best-case O(1) (found at first element).
      • Average & worst-case O(n).

      Use when: array unsorted or small.

      Binary Search

      • Works only on sorted arrays.
      • Repeatedly halves the search range by comparing with middle element.

      How it works (visual):
      Suppose sorted array [1, 3, 5, 7, 9] and target 7:

      low=0, high=4
      mid = (0+4)/2 = 2   -> arr[2]=5  (target > 5) → search right half
      low = mid+1 = 3, high = 4
      mid = (3+4)/2 = 3   -> arr[3]=7  -> found at index 3
      

      Iterative implementation:

      public static int binarySearch(int[] arr, int target) {
          int low = 0, high = arr.length - 1;
          while (low <= high) {
              int mid = low + (high - low) / 2; // avoids overflow
              if (arr[mid] == target) return mid;
              else if (arr[mid] < target) low = mid + 1;
              else high = mid - 1;
          }
          return -1; // not found
      }
      

      Java built-in: Arrays.binarySearch(arr, key)

      • Returns index if found.
      • If not found, returns -(insertionPoint) - 1 (useful to know where it would be inserted).

      Example:

      int[] sorted = {1, 3, 5, 7};
      System.out.println(Arrays.binarySearch(sorted, 7));  // 3
      System.out.println(Arrays.binarySearch(sorted, 4));  // -3  (insertion point 2 → -2-1 = -3)
      

      Complexity: O(log n)

      Pitfall: Using binary search on an unsorted array yields undefined/incorrect results.

      3.3) Sorting

      Goal: arrange elements in order (ascending by default).

      Built-in methods

      • Arrays.sort(array) — sorts primitives and object arrays.
      • Arrays.parallelSort(array) — parallel variant for large arrays (Java 8+).

      Example:

      int[] nums = {5, 3, 8, 1};
      Arrays.sort(nums);
      System.out.println(Arrays.toString(nums)); // [1, 3, 5, 8]
      

      Sorting objects:

      • For object arrays like String[] or Integer[], Arrays.sort uses the objects’ natural ordering (Comparable) or a provided Comparator.
      String[] names = {"Zara", "Adam", "John"};
      Arrays.sort(names); 
      System.out.println(Arrays.toString(names)); // [Adam, John, Zara]
      
      // with Comparator (reverse)
      Arrays.sort(names, Comparator.reverseOrder());
      

      Complexity

      • Typical cost: O(n log n).
      • Use parallelSort for large arrays when parallelism helps (multi-core).

      Notes & best practices

      • After sorting, you can reliably use Arrays.binarySearch.
      • For objects, sorting is stable when using object sort (equal elements keep relative order); if your algorithm depends on stability, mention that in your blog.
      • Sorting modifies the array in-place.

      3.4) Copying arrays (and resizing)

      Arrays have fixed length. To “resize” you create a new array and copy elements into it.

      Methods to copy

      1. System.arraycopy(src, srcPos, dest, destPos, length) — fast native copy.
      int[] src = {1,2,3,4};
      int[] dest = new int[6];
      System.arraycopy(src, 0, dest, 0, src.length);
      System.out.println(Arrays.toString(dest)); // [1,2,3,4,0,0]
      
      1. Arrays.copyOf(original, newLength) — convenient; copies starting from 0:
      int[] arr = {1,2,3};
      int[] bigger = Arrays.copyOf(arr, 5); // [1,2,3,0,0]
      int[] smaller = Arrays.copyOf(arr, 2); // [1,2]
      
      1. Arrays.copyOfRange(original, from, to):
      int[] arr = {0,1,2,3,4};
      int[] slice = Arrays.copyOfRange(arr, 1, 4); // [1,2,3]  (to is exclusive)
      
      1. clone() — shallow copy for arrays:
      int[] a = {1,2};
      int[] b = a.clone(); // new array with same contents
      

      Shallow vs deep copy (object arrays)

      • For String[] or Integer[] (immutable), shallow copy is fine.
      • For arrays of mutable objects, copying copies references, not the object internals.
      class Person { String name; }
      Person[] p1 = new Person[] { new Person("A") };
      Person[] p2 = p1.clone(); // p2[0] references same Person object as p1[0]
      p2[0].name = "B"; // affects p1[0] also
      
      • To deep-copy, you must copy each element (e.g., with a clone/copy constructor for the object).

      Resizing pattern (common)

      int[] arr = {1,2,3};
      // need to add a new value → resize:
      arr = Arrays.copyOf(arr, arr.length + 1);
      arr[arr.length - 1] = 4;
      

      But repeated resizing with arrays is O(n) per resize and expensive. Use ArrayList when you need frequent dynamic resizing.

      Complexity

      • Copying: O(n) (must copy each element).

      3.5) Insertions & Deletions (shifting)

      Arrays are fixed-size, so add/remove require copying or shifting.

      Deleting an element at index pos (shift left)

      public static int[] deleteAt(int[] arr, int pos) {
          if (pos < 0 || pos >= arr.length) throw new IndexOutOfBoundsException();
          int[] res = new int[arr.length - 1];
          System.arraycopy(arr, 0, res, 0, pos);                 // left chunk
          System.arraycopy(arr, pos + 1, res, pos, arr.length - pos - 1); // right chunk
          return res;
      }
      

      Inserting at index pos (shift right)

      public static int[] insertAt(int[] arr, int pos, int value) {
          int[] res = Arrays.copyOf(arr, arr.length + 1);
          System.arraycopy(res, pos, res, pos + 1, arr.length - pos); // shift right
          res[pos] = value;
          return res;
      }
      

      Cost: insertion or deletion = O(n) due to shifting/copying.

      Tip: For many inserts/removes, use ArrayList<Integer> — amortized O(1) append, O(n) insert/remove in middle, but resizing grows exponentially so fewer real copies.

      3.6) Useful java.util.Arrays utilities (short guide)

      • Arrays.toString(arr) — human-readable print (int[]).
      • Arrays.equals(a, b) — element-wise equality.
      • Arrays.fill(arr, val) — fill with value.
      • Arrays.sort(arr) — sort.
      • Arrays.binarySearch(arr, key) — binary search.
      • Arrays.copyOf(...), Arrays.copyOfRange(...) — copy/resize.
      • Arrays.stream(arr) — stream operations.

      Example:

      int[] a = {3,1,2};
      Arrays.sort(a);
      System.out.println(Arrays.toString(a)); // [1,2,3]
      int idx = Arrays.binarySearch(a, 2); // 1

      4. Advantages and Disadvantages of Arrays

      Advantages of Arrays

      ✅ Easy to use.
      ✅ Store multiple values of the same type.
      ✅ Continuous memory (fast access using index).
      ✅ Useful in low-level data handling and algorithms.

      Disadvantages of Arrays

      ❌ Fixed size (cannot grow/shrink dynamically).
      ❌ Cannot store different data types in one array.
      ❌ Insertions & deletions are costly (need shifting).
      ❌ Wastage of memory if array size > required.
      ❌ Lack of built-in methods compared to collections.

      5. Why Collections Framework When Arrays Already Exist?

      Arrays are fundamental in Java, but they come with serious limitations:

      • Fixed Size → Once you create an array, its size cannot grow or shrink. If you need a bigger array, you must create a new one and copy the old elements into it.
      • Limited Utility Methods → Arrays have very few built-in operations. For example, you cannot directly add or remove elements. You need System.arraycopy() or Arrays.copyOf(), which is cumbersome.
      • Homogeneous Elements Only → Arrays store only one type of element. You cannot mix types (except by using Object[], but then type-safety is lost).
      • Insertion & Deletion Costly → Inserting or deleting from the middle of an array requires shifting all subsequent elements, which is inefficient.
      • No Built-in Data Structures → Arrays don’t provide ready-to-use structures like lists, sets, queues, maps, etc. You must build everything manually on top of arrays.

      To overcome these drawbacks, Java introduced the Collections Framework, which provides dynamic, flexible, and feature-rich data structures such as ArrayList, HashSet, HashMap, LinkedList, etc. These are built on top of arrays (or linked nodes), but offer:

      • Dynamic resizing (e.g., ArrayList grows automatically).
      • Rich APIs (add, remove, contains, sort, etc.).
      • Type-safety with Generics (no accidental type mismatch).
      • Better readability and maintainability.
      • Well-tested implementations of common data structures.

      6. Arrays vs Collections Framework

        FeatureArraysCollections Framework
        SizeFixed size once created. To increase/decrease size, a new array must be created and elements copied.Dynamic — can grow or shrink automatically (e.g., ArrayList resizes itself when elements are added/removed).
        TypeHomogeneous only (all elements must be of the same type). Primitive arrays like int[] are supported.Stores objects only (Generics ensure type-safety). Primitives require wrapper classes (Integer, Double).
        Ease of UseLimited functionality. You must write manual code for insertion, deletion, searching, etc.Rich set of APIs (add, remove, contains, sort, iterator) make operations much easier.
        Utility MethodsVery few methods in java.util.Arrays class (sort(), copyOf(), binarySearch(), equals(), etc.).Hundreds of ready-to-use methods across List, Set, Map, Queue, etc.
        PerformanceFaster for primitive data types since no wrapper objects are needed. Best when working with small, fixed-size datasets.Slight overhead due to object wrappers and dynamic resizing. But optimized implementations make them efficient in real-world scenarios.
        FlexibilityVery low. No support for dynamic resizing, heterogeneous data, or complex structures.Very high. Supports Lists, Sets, Maps, Queues, Stacks, etc. Can represent real-world structures more easily.

        ✍️“Although arrays are powerful, they have fixed size and limited functionality. That’s why Java introduced the Collections Framework, which provides dynamic and flexible data structures such as ArrayList, HashSet, and HashMap. You can read my detailed blog on the Java Collections Framework to understand how it solves the limitations of arrays.”


        Conclusion

        Arrays in Java are one of the most fundamental data structures and serve as the backbone for many other data structures and algorithms. They allow you to store and manage multiple values of the same type in a contiguous block of memory, which makes access extremely fast using index-based lookup.

        In this blog, we explored:

        • What arrays are and why they are needed.
        • Types of arrays: single-dimensional, multi-dimensional, and jagged arrays.
        • Array operations such as traversal, searching, sorting, copying, insertion, and deletion.
        • Advantages: simplicity, efficiency, and speed of access.
        • Disadvantages: fixed size, lack of flexibility, and limited built-in methods.
        • Internal working and memory allocation of arrays.

        While arrays are efficient and lightweight, they fall short in real-world applications where we need dynamic resizing, flexible APIs, heterogeneous data handling, and powerful data structures. To overcome these drawbacks, Java introduced the Collections Framework, which provides dynamic and feature-rich alternatives like ArrayList, HashSet, and HashMap.

        • Comparison between ArrayList and LinkedList in Java

          When working with the Java Collection Framework, two commonly used classes for storing dynamic data are ArrayList and LinkedList. Both implement the List interface but differ in internal implementation, performance, and use cases.

          What is ArrayList?

          • ArrayList in Java is backed by a dynamic array.
          • It provides fast random access (O(1)) but slower insertions and deletions in the middle or beginning (O(n)).
          • Best choice when read-heavy operations are frequent.

          What is LinkedList?

          • LinkedList is implemented as a doubly linked list of nodes.
          • Each node stores data along with references to the previous and next nodes.
          • It provides faster insertions and deletions (O(1) at head/tail) but slower random access (O(n)).
          • Best choice when insert/delete-heavy operations are frequent.

          Key Differences between ArrayList and LinkedList in Java

          1. Data Structure

          FeatureArrayListLinkedList
          Internal StructureResizable dynamic arrayDoubly-linked list of nodes
          StorageContiguous memory locationsNodes connected via next and prev pointers
          Memory OverheadLess, only array elementsMore, each node stores prev and next references

          2. Performance / Time Complexity

          OperationArrayListLinkedList
          Access by index (get)O(1)O(n)
          Add at end (add(E e))O(1) amortizedO(1)
          Add at beginning (addFirst)O(n)O(1)
          Add at specific indexO(n)O(n)
          Remove first/last elementO(n)/O(1)O(1)
          Remove by index/valueO(n)O(n)
          Search (contains, indexOf)O(n)O(n)

          3. Iteration Performance

          • ArrayList: Iteration is faster due to contiguous memory (cache-friendly).
          • LinkedList: Iteration is slower since it traverses nodes one by one.

          4. Use Cases

          ArrayListLinkedList
          Frequent access by indexFrequent insertion/deletion at start/middle
          Less memory overheadMore memory usage due to node pointers
          Implementing random-access listsImplementing Queue, Deque, Stack

          5. Summary

          1. ArrayList is backed by an array → good for read-heavy operations.
          2. LinkedList is a doubly-linked list → good for insert/delete-heavy operations.
          3. Choose based on operation frequency:
            • Frequent random access → ArrayList
            • Frequent add/remove from head/middle → LinkedList

          Conclusion

          Both ArrayList and LinkedList are powerful implementations of the List interface in Java. The choice depends on your use case:

          • ArrayList → Best for fast access and iteration.
          • LinkedList → Best for fast insertions/deletions.
        • LinkedList in Java – Complete Guide with Examples

          1. Introduction

          • The LinkedList class in Java is part of the java.util package.
          • It implements both the List and Deque interfaces, which means it can be used as a List, Queue, or Deque (Double Ended Queue).
          • Unlike ArrayList, which is backed by a dynamic array, LinkedList is backed by a doubly-linked list.

          👉 Declaration:

          LinkedList < Type > list = new LinkedList < >();

          2. Internal Working of LinkedList

          LinkedList in Java is implemented as a doubly-linked list, meaning each node contains references to both the previous and next nodes. This structure allows efficient insertion and deletion from both ends of the list.

          • Each element (called a Node) contains:
            • Data
            • Reference to the previous node
            • Reference to the next node
          • The LinkedList maintains head (first element) and tail (last element).
          • This structure allows efficient insertions and deletions but slower random access compared to ArrayList.

          Diagram (for visualization):

          Head <-> Node1 <-> Node2 <-> Node3 <-> Tail

          3. Creating a LinkedList

          import java.util.LinkedList;
          
          public class Example {
              public static void main(String[] args) {
                  LinkedList<String> list = new LinkedList<>();
          
                  // Adding elements
                  list.add("Apple");
                  list.add("Banana");
                  list.add("Mango");
          
                  System.out.println(list); // [Apple, Banana, Mango]
              }
          }
          

          4. Commonly Used Constructors

          • LinkedList() → Creates an empty LinkedList
          • LinkedList(Collection<? extends E> c) → Creates a LinkedList containing elements of the given collection

          5. Methods in LinkedList with Examples

          (a) Adding Elements

          list.add("Orange");         // add at end
          list.addFirst("Grapes");    // add at beginning
          list.addLast("Pineapple");  // add at end
          list.add(2, "Kiwi");        // add at specific index
          

          (b) Accessing Elements

          System.out.println(list.get(0));       // by index
          System.out.println(list.getFirst());   // first element
          System.out.println(list.getLast());    // last element
          

          (c) Updating Elements

          list.set(1, "Strawberry");  // update at index
          

          (d) Removing Elements

          list.remove();            // removes first element
          list.remove(2);           // removes element at index
          list.remove("Mango");     // removes first occurrence
          list.removeFirst();       // removes first element
          list.removeLast();        // removes last element
          

          (e) Searching Elements

          System.out.println(list.contains("Apple")); // true/false
          System.out.println(list.indexOf("Banana")); // returns index
          System.out.println(list.lastIndexOf("Banana")); // last occurrence
          

          (f) Iterating LinkedList

          // Using for-each loop
          for (String fruit: list) {
            System.out.println(fruit);
          }
          
          // Using iterator
          Iterator < String > it = list.iterator();
          while (it.hasNext()) {
            System.out.println(it.next());
          }
          
          // Using descending iterator
          Iterator < String > descIt = list.descendingIterator();
          while (descIt.hasNext()) {
            System.out.println(descIt.next());
          }

          (g) Queue & Deque Methods

          Since LinkedList implements Deque:

          list.offer("Watermelon");   // add at end
          list.offerFirst("Papaya");  // add at beginning
          list.offerLast("Guava");    // add at end
          
          System.out.println(list.peek());       // view head
          System.out.println(list.peekFirst());  // view first
          System.out.println(list.peekLast());   // view last
          
          System.out.println(list.poll());       // remove and return head
          System.out.println(list.pollFirst());  // remove and return first
          System.out.println(list.pollLast());   // remove and return last
          

          6. Time Complexity of LinkedList Operations

          OperationTime Complexity
          Add at beginning (addFirst)O(1)
          Add at end (addLast / add)O(1)
          Add at specific indexO(n)
          Remove first/lastO(1)
          Remove at index/valueO(n)
          Get element by indexO(n)
          Search (contains, indexOf)O(n)
          IterationO(n)

          👉 When to use LinkedList?

          • When frequent insertions and deletions are needed.
          • Not suitable when frequent random access is required (use ArrayList instead).

          7. LinkedList vs ArrayList

          FeatureArrayListLinkedList
          Data StructureDynamic ArrayDoubly Linked List
          Access Time (get)O(1)O(n)
          Insert/Delete at endO(1)O(1)
          Insert/Delete at startO(n)O(1)
          Memory UsageLessMore (extra node pointers)

          8. Real-World Use Cases

          • Implementing Undo/Redo functionality (backed by LinkedList).
          • Navigation (next/previous pages) in browsers.
          • Queue/Deque implementations.

          9. Conclusion

          • LinkedList is best for insertion/deletion-heavy operations.
          • For random access, prefer ArrayList.
          • Knowing both helps in choosing the right data structure for performance optimization.
        • ArrayList in Java – Complete Guide for Developers

          Introduction

          In Java, ArrayList is a part of the Collection Framework and is present in the java.util package. It is a resizable array implementation of the List interface. Unlike arrays, which have a fixed size, an ArrayList can dynamically grow or shrink as elements are added or removed.

          1. Key Features of ArrayList

          1. Dynamic Resizing – Automatically grows when elements exceed capacity and shrinks when elements are removed.
          2. Indexed Access – Provides fast random access using an index (similar to arrays).
          3. Duplicates Allowed – Stores duplicate elements as well as null values.
          4. Maintains Insertion Order – Elements are stored in the order they are inserted.
          5. Non-synchronized – Not thread-safe by default, but can be synchronized using Collections.synchronizedList().
          6. Implements List Interface – Supports all list operations like insertion, deletion, traversal, and searching.
          7. Heterogeneous Data – Technically possible (when using raw types), but not recommended. Best practice is to use generics.

          2. Syntax of ArrayList in Java

          To declare and initialize an ArrayList, you can use the following syntax:

          // Creating an ArrayList of Integer type
          ArrayList < Integer > arr = new ArrayList < Integer > ();
          
          • ArrayList<Integer> specifies that this list will store only Integer values.
          • new ArrayList<Integer>() creates a new empty ArrayList.

          👉You can also create an ArrayList with other data types using generics:

          ArrayList < String > names = new ArrayList < String > (); // Stores String values
          ArrayList < Double > prices = new ArrayList < Double > (); // Stores Double values
          ArrayList < Character > letters = new ArrayList < >(); // Diamond operator, type inferred

          Note:

          • Since Java 7, you can use the diamond operator <> to avoid repeating the type on the right-hand side:
          ArrayList<Integer> numbers = new ArrayList<>(); // Type is inferred as Integer
          • Generics enforce type safety, preventing accidental insertion of wrong types.

          3. Declaration and Initialization

          import java.util.ArrayList;
          
          public class ArrayListExample {
              public static void main(String[] args) {
                  // Creating an ArrayList of String type
                  ArrayList<String> fruits = new ArrayList<>();
          
                  // Adding elements
                  fruits.add("Apple");
                  fruits.add("Banana");
                  fruits.add("Mango");
                  fruits.add("Orange");
          
                  System.out.println(fruits);
              }
          }
          

          Output:

          [Apple, Banana, Mango, Orange]

          4. Common Operations on ArrayList

          The ArrayList class provides many useful methods to perform operations. Let’s look at the most commonly used ones with description and examples:

          4.a. Adding Elements

          • The add() method is used to insert elements into the ArrayList.
          • You can add elements at the end or at a specific index.
          ArrayList < String > fruits = new ArrayList < >();
          
          fruits.add("Apple"); // Adds element at the end
          fruits.add("Banana");
          fruits.add(1, "Mango"); // Adds "Mango" at index 1
          System.out.println(fruits);

          Output:

          [Apple, Mango, Banana]

          4.b. Accessing Elements

          • The get(int index) method returns the element present at the given index.
          • Index starts from 0.
          String fruit = fruits.get(1);
          System.out.println("Element at index 1: " + fruit);

          Output:

          Element at index 1: Mango

          4.c. Updating Elements

          • The set(int index, E element) method replaces the element at the specified index with a new value.
          fruits.set(1, "Orange");   // Replaces "Mango" with "Orange"
          System.out.println(fruits);

          Output:

          [Apple, Orange, Banana]

          4.d. Removing Elements

          • The remove() method deletes elements by value or by index.
          fruits.remove("Banana");   // Removes "Banana"
          fruits.remove(0);          // Removes element at index 0
          System.out.println(fruits);

          Output:

          [Orange]

          4.e. Checking Size

          • The size() method returns the total number of elements in the list.
          System.out.println("Size: " + fruits.size());

          4.f. Iterating Over ArrayList

          • There are multiple ways to iterate over an ArrayList:
          // Using for-each loop
          for (String f : fruits) {
              System.out.println(f);
          }
          
          // Using for loop with index
          for (int i = 0; i < fruits.size(); i++) {
              System.out.println(fruits.get(i));
          }
          
          // Using forEach() method with lambda
          fruits.forEach(System.out::println);
          

          4.g. Checking if Element Exists

          • The contains(Object o) method returns true if the element exists, otherwise false.
          if (fruits.contains("Mango")) {
              System.out.println("Mango is in the list!");
          }

          4.h. Converting ArrayList to Array

          • The toArray() method converts an ArrayList into a normal array.
          String[] arr = fruits.toArray(new String[0]);
          for (String s : arr) {
              System.out.println(s);
          }
          

          Example – Full Program

          import java.util.ArrayList;
          
          public class ArrayListDemo {
              public static void main(String[] args) {
                  ArrayList<String> fruits = new ArrayList<>();
          
                  // Adding elements
                  fruits.add("Apple");
                  fruits.add("Banana");
                  fruits.add("Mango");
                  fruits.add("Orange");
          
                  // Displaying ArrayList
                  System.out.println("Fruits: " + fruits);
          
                  // Accessing elements
                  System.out.println("Element at index 1: " + fruits.get(1));
          
                  // Updating element
                  fruits.set(2, "Papaya");
                  System.out.println("Updated Fruits: " + fruits);
          
                  // Removing element
                  fruits.remove("Orange");
                  System.out.println("After removal: " + fruits);
          
                  // Iterating
                  System.out.println("Iterating with for-each loop:");
                  for (String fruit : fruits) {
                      System.out.println(fruit);
                  }
          
                  // Size of ArrayList
                  System.out.println("Total Fruits: " + fruits.size());
              }
          }
          

          Output:

          Fruits: [Apple, Banana, Mango, Orange]
          Element at index 1: Banana
          Updated Fruits: [Apple, Banana, Papaya, Orange]
          After removal: [Apple, Banana, Papaya]
          Iterating with for-each loop:
          Apple
          Banana
          Papaya
          Total Fruits: 3

          5. When to Use ArrayList in Java

          ArrayList is one of the most commonly used collection classes in Java, but it is not always the best choice for every scenario. Here’s when you should use it:

          5.a. When You Need Dynamic Arrays

          • Unlike standard arrays in Java, the size of an ArrayList can grow or shrink automatically.
          • Use ArrayList when you don’t know the number of elements in advance.

          Example:

          ArrayList < String > names = new ArrayList < >();
          names.add("Alice");
          names.add("Bob"); // size grows automatically
          

          5.b. When You Need Fast Random Access

          • ArrayList provides O(1) time complexity for accessing elements by index because it is internally backed by an array.
          • Ideal when your application frequently retrieves elements by index.

          Example:

          String name = names.get(0); // Fast access
          

          5.c. When Insertion/Deletion is Mostly at the End

          • Adding elements to the end of the list is very efficient (O(1) amortized).
          • Removing or inserting elements in the middle or beginning is slower (O(n)), so avoid if frequent mid-list modifications are required.

          Example:

          names.add("Charlie"); // Efficient
          names.remove(names.size() - 1); // Efficient
          

          5.d. When You Want to Maintain Order

          • ArrayList maintains insertion order, which means elements are stored in the order they were added.
          • Useful when order matters in your application.

          Example:

          ArrayList < String > tasks = new ArrayList < >();
          tasks.add("Design");
          tasks.add("Development");
          tasks.add("Testing");
          System.out.println(tasks); // [Design, Development, Testing]
          

          5.e. When You Need Null or Duplicate Values

          • ArrayList allows duplicate elements and null values, unlike Set implementations.

          Example:

          ArrayList < String > list = new ArrayList < >();
          list.add(null);
          list.add("Apple");
          list.add("Apple"); // Duplicates allowed

          ✅ When Not to Use ArrayList

          • Frequent insertions/deletions in the middle or start → Use LinkedList instead.
          • Thread-safe operations required → Use CopyOnWriteArrayList or Collections.synchronizedList().
          • Primitive types → Consider using arrays or IntStream/long[] for performance, as ArrayList<Integer> introduces boxing/unboxing overhead.

          In short:

          Use ArrayList when you need a dynamic, ordered, and index-based collection where additions/removals are mostly at the end, and you may allow duplicates and nulls.

          6. ArrayList Complexity

          ArrayList is backed by a dynamic array, so operations are indexed-based.

          OperationComplexityNotes
          Access (get/set)O(1)Direct index access.
          Insert at endO(1) amortizedMay require resizing (O(n) occasionally).
          Insert at indexO(n)Shifts elements to the right.
          Remove by indexO(n)Shifts elements to the left.
          Remove by valueO(n)Needs traversal.
          Search (contains, indexOf)O(n)Linear search.
          IterationO(n)Sequential traversal.

          👉 For a detailed guide on initializing an ArrayList using List.of() and Arrays.asList(), check out How to Initialize ArrayList in Java

          🎯Conclusion

          The ArrayList in Java is a powerful and flexible alternative to arrays, especially when you need dynamic resizing, indexed access, and frequent insertions/deletions. However, if thread-safety is required, you should consider using Collections.synchronizedList() or CopyOnWriteArrayList.

        • List Interface in Java : Complete Guide for Developers

          The List interface in Java represents an ordered collection that allows duplicate elements and provides positional access. It is a part of the java.util package and extends the Collection interface. Lists are commonly used when the order of elements matters, and when you need to access elements by their index position.

          Key Characteristics of List:

          • Ordered Collection: Elements in a List are ordered, meaning they maintain the sequence in which they were inserted.
          • Allows Duplicates: A List can contain multiple occurrences of the same element.
          • Indexed Access: Elements can be accessed using an integer index, with the first element at index 0.
          • Null Elements: List implementations allow the inclusion of null elements.

          Declaration of the Java List Interface

          The List interface in Java is declared as follows:

          public interface List<E> extends Collection<E> { }

          It represents an ordered collection that allows duplicate elements and provides positional access.

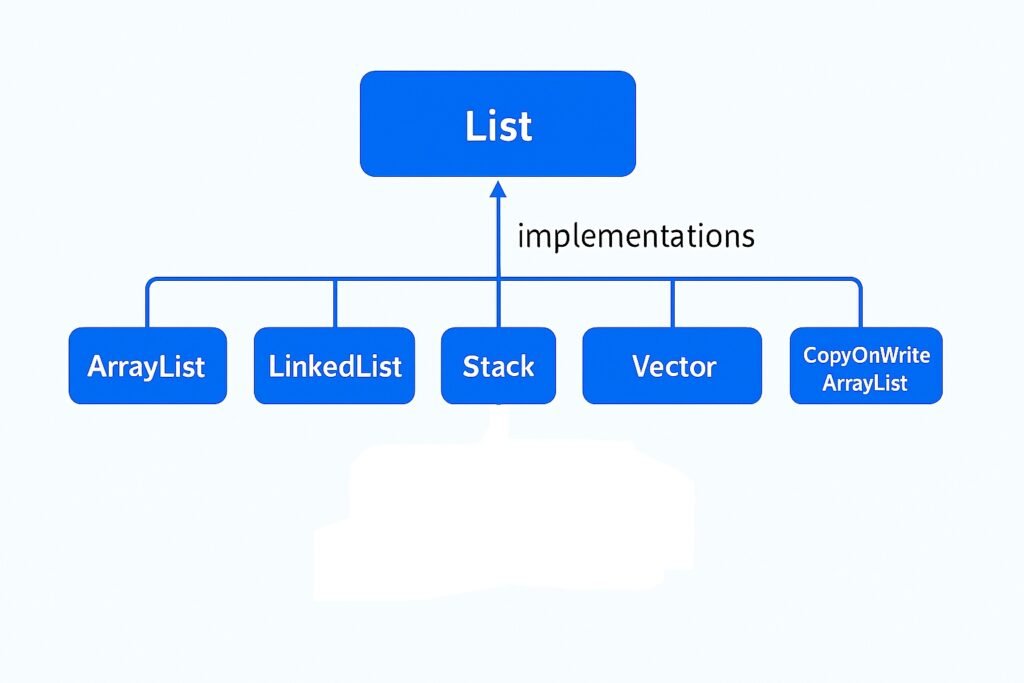
          Since List is an interface, we cannot instantiate it directly. Instead, we create an instance of a class that implements it, such as ArrayList, LinkedList, or Vector.

          Example:

          import java.util.List;
          import java.util.ArrayList;
          
          public class ListDemo {
              public static void main(String[] args) {
                  // Instantiate a List using ArrayList
                  List<String> list = new ArrayList<>();  // Using ArrayList
                  list.add("Java");
                  list.add("Python");
                  list.add("C++");
          
                  System.out.println(list); //Output: [Java, Python, C++]
              }
          }

          Explanation:

          • List<String> → The generic type <String> specifies that this list will store String elements.
          • new ArrayList<>() → We are creating an ArrayList instance that implements the List interface.

          Common Implementations of List:

          List Implementation classes

          Java provides several classes that implement the List interface, each with its own characteristics and use cases:

          1. ArrayList: A resizable array implementation of the List interface. It allows fast random access and is efficient for storing and accessing data. However, adding or removing elements (except at the end) can be slow due to the need to shift elements.
          2. LinkedList: A doubly-linked list implementation of the List interface. It allows for efficient insertion or removal of elements from both ends and from the middle of the list. However, it provides slower access to elements by index compared to ArrayList.
          3. Vector: An older implementation of the List interface. It is similar to ArrayList but is synchronized, making it thread-safe. However, this synchronization comes with a performance cost.
          4. Stack: A subclass of Vector that represents a last-in, first-out stack of objects. It provides methods like push(), pop(), and peek() to operate on the stack.
          5. CopyOnWriteArrayList: A thread-safe variant of ArrayList where all mutative operations (like add, set, etc.) are implemented by making a fresh copy of the underlying array. This is useful when you have a list that is frequently read but infrequently modified.

          Java List – Operations in Detail

          The List interface in Java (part of the Collection Framework) represents an ordered collection that can contain duplicate elements.
          Common implementations: ArrayList, LinkedList, CopyOnWriteArrayList, Vector.

          1. Creating a List

          import java.util.*;
          
          public class ListCreation {
              public static void main(String[] args) {
                  List<String> list = new ArrayList<>();  // Using ArrayList
                  list.add("Java");
                  list.add("Python");
                  list.add("C++");
          
                  System.out.println(list); // [Java, Python, C++]
              }
          }

          2. Adding Elements

          • add(E e) → Adds element at the end.
          • add(int index, E e) → Inserts element at a specific index.
          list.add("Go");            // Adds at end
          list.add(1, "Kotlin");     // Inserts at index 1
          

          3. Accessing Elements

          • get(int index) → Retrieves element at given index.
          System.out.println(list.get(0));  // Java
          System.out.println(list.get(2));  // Kotlin
          

          4. Updating Elements

          • set(int index, E e) → Replaces element at index.
          list.set(2, "Rust");  
          System.out.println(list); // [Java, Kotlin, Rust, Go]
          

          5. Removing Elements

          • remove(int index) → Removes by index.
          • remove(Object o) → Removes first occurrence of object.
          • clear() → Removes all elements.
          list.remove("Kotlin");   // Removes element
          list.remove(1);          // Removes by index
          list.clear();            // Removes all
          

          6. Searching in List

          • contains(Object o) → Checks if element exists.
          • indexOf(Object o) → First index of element, or -1 if not found.
          • lastIndexOf(Object o) → Last index of element.
          System.out.println(list.contains("Java"));   // true
          System.out.println(list.indexOf("Java"));    // 0
          System.out.println(list.lastIndexOf("Go"));  // 3
          

          7. Iterating Over a List

          • For-each Loop
          for (String lang: list) {
            System.out.println(lang);
          }
          • Iterator
          Iterator < String > itr = list.iterator();
          while (itr.hasNext()) {
            System.out.println(itr.next());
          }
          • ListIterator (Bidirectional)
          ListIterator < String > litr = list.listIterator();
          while (litr.hasNext()) {
            System.out.println(litr.next());
          }
          • Java 8+ forEach with Lambda
          list.forEach(System.out::println);
          

          8. Sorting a List

          Collections.sort(list);                  // Natural order
          list.sort(Comparator.reverseOrder());    // Reverse order
          

          9. Sublist Operation

          List < String > sub = list.subList(1, 3);
          System.out.println(sub); // [Python, C++]

          10. Converting List to Array

          String[] arr = list.toArray(new String[0]);
          System.out.println(Arrays.toString(arr));
          

          11. Streams & Functional Operations (Java 8+)

          list.stream()
              .filter(lang -> lang.startsWith("J"))
              .forEach(System.out::println);   // Java

          12. Checking if an Element is Present in a List

          The List interface provides methods to check whether an element exists inside a list.

          ✅ Methods Used

          1. contains(Object o) → Returns true if the list contains the specified element, else false.
          2. indexOf(Object o) → Returns the first index of the element, or -1 if not found.
          3. lastIndexOf(Object o) → Returns the last index of the element, or -1 if not found.

          Example

          import java.util.*;
          
          public class ListSearchExample {
              public static void main(String[] args) {
                  List<String> languages = new ArrayList<>();
                  languages.add("Java");
                  languages.add("Python");
                  languages.add("C++");
                  languages.add("Java"); // duplicate
          
                  // 1. contains()
                  System.out.println(languages.contains("Java"));   // true
                  System.out.println(languages.contains("Rust"));   // false
          
                  // 2. indexOf()
                  System.out.println(languages.indexOf("Java"));    // 0 (first occurrence)
                  System.out.println(languages.indexOf("Rust"));    // -1 (not found)
          
                  // 3. lastIndexOf()
                  System.out.println(languages.lastIndexOf("Java")); // 3 (last occurrence)
              }
          }
          

          Output

          true
          false
          0
          -1
          3

          📌 Summary Table of List Operations

          OperationMethod ExampleDescription
          Addadd("Java"),addAll()Insert element
          Accessget(0)Retrieve element
          Updateset(1, "Kotlin")Replace element
          Removeremove("Java"),removeAll(), retainAll(), clear()Remove by value
          Searchcontains("Java"),indexOf(), lastIndexOf()Check existence
          IterateforEach(System.out::println),iterator(), listIterator(), spliterator()Traverse list
          SortCollections.sort(list)Sort elements
          SublistsubList(1, 3)Extract portion
          ConverttoArray(), size(), isEmpty()Convert to array, Get size of elements, Check if the list is empty

          ✅ In short:
          The List interface in Java provides powerful operations to manage ordered collections, making it one of the most widely used data structures in Java applications.

        • Java Collection Framework – A Complete Guide with Examples

          Introduction

          Why Collections Came into Picture:
          ✍️In Java, arrays have a fixed size and lack built-in methods for easy manipulation like adding, removing, or searching elements. To overcome these limitations, the Collection Framework was introduced, providing dynamic data structures with rich utility methods. For a detailed understanding of arrays in Java, you can check Java Arrays Tutorial

          The Java Collection Framework (JCF) is a unified architecture for storing and manipulating groups of objects. It provides ready-to-use data structures (like List, Set, Map, Queue) and algorithms (like sorting, searching, iteration).

          Instead of writing complex data structures manually, Java developers can use these pre-built and optimized collections.

          👉 The framework is part of java.util package and was introduced in Java 2 (JDK 1.2), but has been enhanced with each release up to the latest Java 25.

          Why Use Collection Framework?

          • Reduces development effort → ready-to-use data structures.
          • Improves performance → optimized implementations.
          • Increases code quality → reusable, consistent APIs.
          • Type safety with Generics (introduced in Java 5).
          • Concurrent utilities (from Java 5 onwards, updated till Java 25).

          Collection Framework Hierarchy

          At the top level, we have two main root interfaces:

          1. Collection Interface (java.util.Collection)
            • Extended by List, Set, and Queue.
          2. Map Interface (java.util.Map)
            • A separate hierarchy for key-value pairs.

          Hierarchy Overview:

                                                    Iterable
                                                       |
                                         +--------------+-------------------------+
                                         |                                        |
                                +-----Collection---------------+                 Map
                              /            |                   |                  |
                             /             |                   |                  |
                          List            Set----+            Queue            SortedMap
                          /                |      \            |                  |
              +--------+----------+        |       \           |                  |
              |        |          |    SortedSet  HashSet    Deque          NavigableMap
          ArrayList Vector LinkedList      |         |
                                      NavigableSet LinkedHashSet
                                           |
                                        TreeSet

          Key Interfaces and Classes

          At the heart of the Java Collections Framework are a set of key interfaces — Collection, List, Set, Queue, Deque, and Map. These interfaces establish the contracts that different collection classes must follow, providing guidelines for how data can be stored, accessed, and manipulated.

          • List Interface
          • Set Interface
          • Queue Interface
          • Deque Interface
          • Map Interface

          1. List Interface

          Represents an ordered collection that allows duplicate elements and provides positional access. Lists include dynamic arrays, linked structures, and legacy classes designed for sequential storage.

          • Index-based access.

          Popular Implementations:

          • ArrayList
          • LinkedList
          • Vector
          • Stack
          • CopyOnWriteArrayList

          Example:

          import java.util.*;
          
          public class ListExample {
              public static void main(String[] args) {
                  List<String> fruits = new ArrayList<>();
                  fruits.add("Apple");
                  fruits.add("Banana");
                  fruits.add("Mango");
                  fruits.add("Apple"); // allows duplicates
          
                  System.out.println("Fruits List: " + fruits);
              }
          }
          

          2. Set Interface

          Represents a collection that does not allow duplicate elements. Sets are used to model mathematical sets and may or may not preserve insertion order, depending on the implementation.

          Popular Implementations:

          • HashSet
          • LinkedHashSet
          • TreeSet
          • CopyOnWriteArraySet

          Example:

          import java.util.*;
          
          public class SetExample {
              public static void main(String[] args) {
                  Set<String> names = new HashSet<>();
                  names.add("Simone");
                  names.add("Jeremy");
                  names.add("Simone"); // ignored
          
                  System.out.println("Names: " + names);
              }
          }
          

          3. Queue Interface

          Represents a collection designed for holding elements prior to processing. Queues typically follow FIFO (First-In-First-Out) order, but priority-based or custom orderings are also possible.

          Popular Implementations:

          • LinkedList
          • PriorityQueue
          • ArrayDeque
          • ConcurrentLinkedQueue
          • LinkedBlockingQueue

          Example:

          import java.util.*;
          
          public class QueueExample {
              public static void main(String[] args) {
                  Queue<Integer> queue = new LinkedList<>();
                  queue.add(10);
                  queue.add(20);
                  queue.add(30);
          
                  System.out.println("Queue: " + queue);
                  System.out.println("Removed: " + queue.poll()); // removes first
                  System.out.println("After removal: " + queue);
              }
          }
          

          4. Deque Interface

          A double-ended queue that supports element insertion and removal at both ends. Deques can function as stacks (LIFO) or queues (FIFO), providing flexible access patterns.

          Popular Implementations:

          • ArrayDeque.
          • ConcurrentLinkedDeque
          • LinkedBlockingDeque
          • LinkedList

          Example:

          import java.util.*;
          
          public class DequeExample {
              public static void main(String[] args) {
                  Deque<String> dq = new ArrayDeque<>();
                  dq.addFirst("Start");
                  dq.addLast("End");
          
                  System.out.println(dq);
              }
          }
          

          5. Map Interface

          Represents a collection of key–value pairs, where keys are unique and each key maps to exactly one value. Maps are not true collections but provide a way to store and retrieve data based on unique identifiers.

          • Keys are unique, values can be duplicate.

          Popular Implementations:

          • HashMap
          • LinkedHashMap
          • TreeMap
          • Hashtable
          • ConcurrentHashMap (thread-safe)

          Example:

          import java.util.*;
          
          public class MapExample {
              public static void main(String[] args) {
                  Map<Integer, String> students = new HashMap<>();
                  students.put(1, "Alice");
                  students.put(2, "Bob");
                  students.put(3, "Charlie");
          
                  System.out.println("Students: " + students);
                  System.out.println("Student with ID 2: " + students.get(2));
              }
          }
          

          6.Utility Class: Collections

          The Collections class (part of java.util package) is a utility class that provides static methods to operate on or return collections.

          It is different from the Collections Framework itself. The Collections Framework provides data structures (List, Set, Map, etc.), while the Collections class provides algorithms and helper methods to work with those data structures.

          Key Features of Collections Class

          1. Algorithms → Sorting, Searching, Shuffling, Reversing, Rotating, etc.
          2. Synchronization Wrappers → Convert non-thread-safe collections into thread-safe ones.
          3. Read-only Wrappers → Create immutable collections.
          4. Utility Methods → Frequency count, finding min/max, filling collections, etc.

          Method :

          MethodDescriptionExample
          sort(List<T> list)Sorts the list in ascending order.Collections.sort(list);
          reverse(List<?> list)Reverses the list order.Collections.reverse(list);
          min(Collection<? extends T> coll)Returns minimum element.Collections.min(list);
          max(Collection<? extends T> coll)Returns maximum element.Collections.max(list);
          frequency(Collection<?> c, Object o)Counts frequency of element.Collections.frequency(list, "Java");

          Example:

          Example 1: Sorting and Reversing

          import java.util.*;
          
          public class CollectionsExample1 {
              public static void main(String[] args) {
                  List<String> names = new ArrayList<>();
                  names.add("Aryan");
                  names.add("Ashish");
                  names.add("bhasker");
                  names.add("Devid");
          
                  // Sorting (Ascending Order)
                  Collections.sort(names);
                  System.out.println("Sorted List: " + names);
          
                  // Reversing
                  Collections.reverse(names);
                  System.out.println("Reversed List: " + names);
          
                  // Shuffling
                  Collections.shuffle(names);
                  System.out.println("Shuffled List: " + names);
              }
          }
          

          Output (may vary due to shuffle):

          Sorted List: [Aryan, Ashish, Bhasker, Devid]
          Reversed List: [Devid, Bhasker, Ashish, Aryan]
          Shuffled List: [Ashish, Devid, Bhasker, Aryan]   // shuffle can change each time
          

          Example 2: Finding Min, Max, and Frequency

          import java.util.*;
          
          public class CollectionsExample2 {
              public static void main(String[] args) {
                  List<Integer> numbers = Arrays.asList(10, 20, 30, 10, 50, 10);
          
                  int min = Collections.min(numbers);
                  int max = Collections.max(numbers);
                  int freq = Collections.frequency(numbers, 10);
          
                  System.out.println("Minimum: " + min);
                  System.out.println("Maximum: " + max);
                  System.out.println("Frequency of 10: " + freq);
              }
          }
          

          Output:

          Minimum: 10  
          Maximum: 50  
          Frequency of 10: 3  
          

          Example 3: Creating Read-only and Synchronized Collections

          import java.util.*;
          
          public class CollectionsExample3 {
              public static void main(String[] args) {
                  List<String> list = new ArrayList<>();
                  list.add("Java");
                  list.add("Python");
                  list.add("C++");
          
                  // Unmodifiable (Read-only) List
                  List<String> unmodifiableList = Collections.unmodifiableList(list);
                  System.out.println("Unmodifiable List: " + unmodifiableList);
                  // unmodifiableList.add("Go"); // Throws UnsupportedOperationException
          
                  // Synchronized List (Thread-safe wrapper)
                  List<String> syncList = Collections.synchronizedList(list);
                  System.out.println("Synchronized List: " + syncList);
              }
          }
        • Java HashMap Internal Implementation and How It Works

          HashMap in Java is a data structure that stores key-value pairs. It is part of the Java Collections Framework and provides constant-time performance O(1) for basic operations like get() and put(), assuming a good hash function.

          1. Data Structure Used in HashMap

          Internally, a HashMap is implemented as an array of buckets.
          Each bucket is a linked list (before Java 8) or a balanced tree (red-black tree) (from Java 8 onwards, if collisions become too many).

          Node Structure

          Each node stores:

          • hash → the hash code of the key
          • key → the key object
          • value → the associated value
          • next → reference to the next node in case of a collision
          static class Node < K,V > implements Map.Entry < K,V > {
            final int hash;    // hash code of the key
            final K key;       // key object
            V value;           // value associated with the key
            Node < K,V > next; // link to the next node (for collisions)
            Node(int hash, K key, V value, Node < K, V > next) {
              this.hash = hash;
              this.key = key;
              this.value = value;
              this.next = next;
            }
          }

          So, at a high level:

          • The array holds buckets.
          • Each bucket is either empty or holds a chain/tree of nodes.
          • Each node stores the mapping (key → value) along with links for collision handling.

          🔹3. Hashing in HashMap

          Hashing is the process of converting an object into an integer using the hashCode() method.

          • hashCode() determines the bucket location where the key-value pair will be stored.
          • If two keys have the same hash code, they may go into the same bucket (collision).
          • To differentiate keys in the same bucket, HashMap also uses the equals() method.

          Example – Custom Key Class

          Suppose we want to store Employee details in a HashMap, where each Employee ID uniquely identifies the employee.

          // EmployeeKey class used as HashMap key
          class EmployeeKey {
              private int empId;
              private String department;
          
              EmployeeKey(int empId, String department) {
                  this.empId = empId;
                  this.department = department;
              }
          
              // Override hashCode for bucket calculation
              @Override
              public int hashCode() {
                  // A robust hash: combine empId and department
                  return 31 * empId + (department != null ? department.hashCode() : 0);
              }
          
              // Override equals to ensure key uniqueness
              @Override
              public boolean equals(Object obj) {
                  if (this == obj) return true;
                  if (obj == null || getClass() != obj.getClass()) return false;
                  EmployeeKey other = (EmployeeKey) obj;
                  return empId == other.empId &&
                         (department != null && department.equals(other.department));
              }
          }

          Usage in HashMap

          import java.util.HashMap;
          
          public class EmployeeDemo {
              public static void main(String[] args) {
                  // Create EmployeeKey-based HashMap
                  HashMap<EmployeeKey, String> empMap = new HashMap<>();
          
                  // Insert employee data
                  empMap.put(new EmployeeKey(101, "HR"), "Alice");
                  empMap.put(new EmployeeKey(102, "IT"), "Bob");
                  empMap.put(new EmployeeKey(103, "Finance"), "Charlie");
          
                  // Retrieve employee using same key
                  System.out.println("Employee 101 in HR: " +
                      empMap.get(new EmployeeKey(101, "HR")));
          
                  // Try another department with same ID (different key)
                  System.out.println("Employee 101 in IT: " +
                      empMap.get(new EmployeeKey(101, "IT"))); // null
              }
          }

          Output

          Employee 101 in HR: Alice
          Employee 101 in IT: null
          • Why this is better?
          • Shows how hashCode() and equals() must be implemented for correct key comparison.
          • Demonstrates different objects with same ID but different department being treated as different keys.

          🔹3.a. hashCode() in Java

          • Defined in Object class → public native int hashCode();
          • The hashCode() method returns an integer value (hash code) for an object.
          • By default (from Object class), it gives a number based on the memory reference of the object.
          • You can override hashCode() in your class to provide your own logic (usually based on object fields).
          • In HashMap, HashSet, and other hash-based collections, hashCode() is used to decide which bucket (index) an object will be stored in.

          The syntax of the hashCode() method in Java looks like this:

          @Override
          public int hashCode() {
              // Implementation to calculate and return the hash code
          }

          When we insert a key-value pair, HashMap does not directly use the hashCode() value as the array index. Instead, it applies a supplemental hash function and then calculates the index using the formula:

          index = hashCode(key) & (n - 1)

          where n is the capacity (default = 16).

          Example

          class Student {
              int id;
              String name;
          
              @Override
              public int hashCode() {
                  return id; // simple implementation using 'id'
              }
          }

          Here, the student’s id is used to generate the hash code. So two students with the same id will go into the same bucket.

          ✅ In short:
          hashCode() gives an integer for every object. Hash-based collections (like HashMap) use it to find the storage location (bucket).

          🔹3.b. equals() Method in Java

          • The equals() method is used to check if two objects are logically equal.
          • It is defined in the Object class, so every class in Java inherits it.
          • By default, Object.equals() compares memory references (i.e., checks if both references point to the same object).

          👉 But in real-world applications, we often care about the content of objects, not just memory references. That’s why we override equals().

          ✅ Syntax

          @Override
          public boolean equals(Object obj) {
              // Implementation to compare the current object with another object
          }

          ➤ Example Without Overriding

          class Student {
              int id;
              String name;
          
              Student(int id, String name) {
                  this.id = id;
                  this.name = name;
              }
          }
          
          public class TestEquals {
              public static void main(String[] args) {
                  Student s1 = new Student(1, "Ashish");
                  Student s2 = new Student(1, "Ashish");
          
                  System.out.println(s1.equals(s2)); // false ❌ (different memory locations)
              }
          }
          

          👉 Even though both students have the same data, equals() returns false because the default Object.equals() checks references.

          Example With Overriding

          import java.util.Objects;
          
          class Student {
              int id;
              String name;
          
              Student(int id, String name) {
                  this.id = id;
                  this.name = name;
              }
          
              @Override
              public boolean equals(Object obj) {
                  if (this == obj) return true;              // same reference
                  if (!(obj instanceof Student)) return false; // type check
          
                  Student other = (Student) obj;             // cast
                  return id == other.id && Objects.equals(name, other.name);
              }
          }
          
          public class TestEquals {
              public static void main(String[] args) {
                  Student s1 = new Student(1, "Ashish");
                  Student s2 = new Student(1, "Ashish");
          
                  System.out.println(s1.equals(s2)); // true ✅ (same content)
              }
          }

          👉 Now equals() checks values (id and name) instead of memory.
          So two students with the same data are considered equal.

          3.c. Default implementation and System.identityHashCode()

          • Object.hashCode()’s default implementation typically returns a value derived from the object identity (often related to the memory address or an internal identity hash). The exact mechanism is JVM-dependent.
          • System.identityHashCode(obj) returns the identity hash code one would get from Object even if the class overrides hashCode().

          ✍️ default identity hash codes are usually stable for the lifetime of the object within a single JVM run, but should not be treated as persistent identifiers across runs.

          🔹4. How HashMap Uses equals()

          1. When you put a key in HashMap, first it calls hashCode() to find the bucket.
          2. If multiple keys go into the same bucket (collision), HashMap then uses equals() to compare the keys.
          3. If equals() returns true, it treats them as the same key and replaces the value.

          * Example with HashMap

          import java.util.*;
          
          class Employee {
              int id;
              String name;
          
              Employee(int id, String name) {
                  this.id = id;
                  this.name = name;
              }
          
              @Override
              public boolean equals(Object obj) {
                  if (this == obj) return true;
                  if (!(obj instanceof Employee)) return false;
          
                  Employee other = (Employee) obj;
                  return id == other.id && Objects.equals(name, other.name);
              }
          
              @Override
              public int hashCode() {
                  return Objects.hash(id, name); // must override with equals()
              }
          }
          
          public class HashMapExample {
              public static void main(String[] args) {
                  Map<Employee, String> map = new HashMap<>();
          
                  Employee e1 = new Employee(101, "John");
                  Employee e2 = new Employee(101, "John");
          
                  map.put(e1, "Developer");
                  map.put(e2, "Manager");
          
                  System.out.println(map.size()); // 1 ✅ (same key because equals() is true)
                  System.out.println(map.get(e1)); // Manager
              }
          }

          Output :

          1
          Manager

          🔹5. Buckets, Load Factor, and Capacity in Detail

          1. Bucket
            • A bucket is an element inside the internal array of a HashMap.Each bucket stores key-value pairs (as Node objects).If two different keys generate the same index (collision), they are stored in the same bucket using a Linked List or Balanced Tree (after Java 8, if collisions exceed a threshold).
            👉 Example: If both "Ashish" and "Aryan" hash to index 5, both entries are stored in bucket 5.
          2. Capacity
            • The capacity of a HashMap means the total number of buckets available.
            • The default capacity is 16.
            • When you create a new HashMap without specifying size:
                • HashMap<String, String> map = new HashMap<>();
            • Internally, it creates an array of 16 buckets.
            • 👉 Capacity decides how many buckets are available to store key-value pairs.
          1. Load Factor
            • The load factor is a measure of how full the HashMap can get before it needs to resize.
            • Default load factor = 0.75 (75%).
            • Formula:
              • threshold = capacity * load factor
            • Example: If capacity = 16 and load factor = 0.75, then threshold = 16 * 0.75 = 12.
            • This means when the number of stored entries goes beyond 12, the HashMap will automatically rehash (resize).
          1. Rehashing (Resize Process)
            • When the threshold is crossed, the capacity of the HashMap is doubled.
            • For example:
              • Initial capacity = 16, threshold = 12.
              • If we insert the 13th element, capacity becomes 32, and all existing key-value pairs are rehashed (re-distributed into new buckets).
            👉 Rehashing ensures that performance remains close to O(1) for get() and put() operations.

          ✅ Example to Understand

          import java.util.HashMap;
          
          public class HashMapBucketsExample {
              public static void main(String[] args) {
                  HashMap<Integer, String> map = new HashMap<>();
          
                  // inserting 13 elements (default threshold is 12)
                  for (int i = 1; i <= 13; i++) {
                      map.put(i, "Value " + i);
                  }
              }
          }

          What happens internally:

          • Capacity = 16, Load Factor = 0.75 → Threshold = 12.
          • As soon as the 13th entry is inserted, rehashing happens.
          • New Capacity = 32, New Threshold = 32 * 0.75 = 24.

          🔹6. Internal Working of put() Method

          1️⃣ Inserting First Key-Value Pair

          map.put(new Key("apple"), 100);

          Steps:

          1. Calculate hash code of Key {"apple"} → assume 118.
          2. Calculate index → 118 & (16-1) = Result: 6 (Convert Numbers to Binary and Apply Bitwise AND (&)
          3. Create a Node object:
            • {
              int hash = 118
              Key key = {“apple”}
              Integer value = 100
              Node next = null
              }
          4. Place this object at index 6 (since no other entry is present there).

          ✍️Note : To calculate the bucket index, first subtract 1 from the capacity (n-1), convert both the hash code and (n-1) to binary, and then apply the bitwise AND (&) operation. For example:

          <strong>Index = 118 & (16 - 1) 
                = 118 & 15
                = 6</strong>

          So, the key with hash code 118 will be stored in bucket index 6.”

          2️⃣ Inserting Second Key-Value Pair

          map.put(new Key("banana"), 200);

          Steps:

          1. Calculate hash code of Key {"banana"} → assume 115.
          2. Calculate index → 115 & (16 - 1) = 3.
          3. Create a Node object:
            • {
              int hash = 115
              Key key = {“banana”}
              Integer value = 200
              Node next = null
              }

          👉 Place this object at index 3.

          3️⃣ Inserting Third Key-Value Pair (Collision Example)

          1. Bucket Selection → HashMap checks the bucket at that index.
            • If empty → insert new node.
            • If not empty (collision) → compare keys using equals().
              • If key already exists → replace value.
              • If different key → add new node to linked list / tree.
          2. Treeification (Java 8+) → If a bucket contains more than 8 nodes, it is converted from linked list → red-black tree for faster lookup.

          Collision Example

          map.put(new Key("grapes"), 300);

          Steps:

          1. Calculate hash code of Key {"grapes"} → assume 118.
          2. Calculate index → 118 & (16 - 1) = 6.
          3. Create a Node object:
            • {
              int hash = 118
              Key key = {“grapes”}
              Integer value = 300
              Node next = null
              }

          👉 Now, index 6 is already occupied by "apple".

          • Check hashCode() and equals().
            • If both keys are the same → update the value.
            • Otherwise → link "grapes" node to "apple" node (using next reference).

          So, at index 6, we now have a linked list:

          👉 If another key with same hash is inserted → collision occurs → handled using LinkedList (JDK 7) or Balanced Tree (JDK 8+ if >8 entries).

          ✅Final HashMap buckets after these insertions:

          • Index 3 → banana=200
          • Index 6 → apple=100 → grapes=300

          ✍️Both apple and grapes will be stored in bucket[6]. If the keys are equal, the value is replaced; otherwise, they are linked together using the next reference.

            HashMap Buckets After Insertions

            Buckets (capacity = 16)
            
            Index 0   : null
            Index 1   : null
            Index 2   : null
            Index 3   : [banana=200]
            Index 4   : null
            Index 5   : null
            Index 6   : [apple=100] -> [grapes=300]   (Collision handled via Linked List)
            Index 7   : null
            Index 8   : null
            Index 9   : null
            Index 10  : null
            Index 11  : null
            Index 12  : null
            Index 13  : null
            Index 14  : null
            Index 15  : null

            🔹6. Internal Working of get() Method

            The get(K key) method is used to fetch the value associated with a given key.
            If the key does not exist, null is returned.

            Example 1: Fetch the data for key "banana"

            map.get(new Key("banana"));

            Steps:

            1. Calculate hash code of key "banana" → assume 115.
            2. Calculate index → 115 & (16 - 1) = 3.
            3. Go to index 3 of the bucket array.
            4. Compare the key using equals() at index 3 with "banana".
              • If match found → return value.✅

            👉 Output: 200

            Example 2: Fetch the data for key "grapes"

            map.get(new Key("grapes"));

            Steps:

            1. Calculate hash code of key {"grapes"} → assume 118.
            2. Calculate index → 118 & (16 - 1) = 6.
            3. Go to index 6 of the bucket array.
              • First element at index 6 is "apple". Compare keys using equals() with "grapes".
              • Not equal ❌ → move to next node.
            4. Second element at index 6 is "grapes". Compare with "grapes".
              • Match found ✅.
              • Return value → 300.

            👉 Output: 300

            ✍️Note: The keys are compared using the equals() method. If a match is found, the corresponding value is returned; otherwise, the traversal continues to the next node until either a match is found or null is reached.

            👉 Time Complexity:

            • Best Case: O(1) (no collisions)
            • Worst Case: O(log n) (tree structure in case of too many collisions)

            🔹7. Performance Characteristics

            • put() / get() → O(1) average, O(log n) worst-case (tree), O(n) worst (linked list with poor hash).
            • resize() → Expensive, so choose an initial capacity if possible.
            • Iteration → O(n), since all entries must be visited.

            🔹8. Important Points

            1. Keys must implement hashCode() and equals() properly.
            2. HashMap allows one null key and multiple null values.
            3. HashMap is not synchronized (use ConcurrentHashMap in multithreaded apps).
            4. Iterators are fail-fast → they throw ConcurrentModificationException if structure changes during iteration.

            For complete details and official documentation on Java HashMap, you can refer to the Oracle HashMap API

          • Deep Copy in Constructor for Immutable Classes in Java

            1. Mutable Object Passed in Constructor

            • Example: If a Date or ArrayList is passed to the constructor, the caller might still hold a reference to that object and modify it later.
            • Solution: Perform deep copy inside the constructor.
            public final class Student {
                private final String name;
                private final Date dob; // mutable
            
                public Student(String name, Date dob) {
                    this.name = name;
                    this.dob = new Date(dob.getTime()); // defensive copy
                }
            }

            ✅ This ensures the Student object has its own copy, independent of the caller’s object.

            2. Returning Mutable Objects in Getters

            • If you directly return the mutable field, external code can modify it.
            • Example:
            public Date getDob() {
                return dob; // ❌ exposes internal state
            }

            Instead, return a copy:

            public Date getDob() {
                return new Date(dob.getTime()); // ✅ defensive copy
            }

            3. Collections as Fields

            • Arrays, Lists, Maps, and Sets are mutable. If directly exposed, immutability is lost.
            • Example:
            public final class Department {
              private final List < String > employees;
            
              public Department(List < String > employees) {
                this.employees = new ArrayList < >(employees); // deep copy
              }
            
              public List < String > getEmployees() {
                return new ArrayList < >(employees); // defensive copy
              }
            }

            ✅ Both constructor and getter ensure immutability.

            4. Nested Mutable Objects

            • If your mutable field contains other mutable objects (like List<Person>), you need to ensure deep copying of each element, not just the collection.
            • Example:
            public final class Team {
              private final List < Person > members;
            
              public Team(List < Person > members) {
                this.members = new ArrayList < >();
                for (Person p: members) {
                  this.members.add(new Person(p)); // assume Person has copy constructor
                }
              }
            
              public List < Person > getMembers() {
                List < Person > copy = new ArrayList < >();
                for (Person p: members) {
                  copy.add(new Person(p));
                }
                return copy;
              }
            }

            ✅ Each Person is copied, ensuring no shared reference.

            ⚠️ What to Be Careful About

            1. Shallow Copy vs Deep Copy
              • Shallow Copy: Copies only the reference (object identity remains shared).
              • Deep Copy: Copies the actual object state, ensuring no external modification.
            2. Performance Overhead
              • Deep copying collections or nested objects can be costly in terms of memory and CPU.
              • If immutability isn’t critical, consider alternatives like unmodifiable collections (Collections.unmodifiableList()).
            3. Unmodifiable Wrappers
              • Instead of deep copying, sometimes you can wrap collections in unmodifiable wrappers:

            Example :

            import java.util.Collections;
            
            public final class Department {
              private final List < String > employees;
            
              public Department(List < String > employees) {
                this.employees = Collections.unmodifiableList(new ArrayList < >(employees));
              }
            
              public List < String > getEmployees() {
                return employees; // already unmodifiable
              }
            }

            ✅ This prevents external modification but is lighter than full deep copy.

            Serialization and Deserialization

            • When your immutable class is serialized and deserialized, ensure the deep copy logic is preserved (custom read methods if needed).
            • 👉 “To dive deeper into how serialization affects immutability and how to preserve thread-safety with techniques like readObject, readResolve, and the Serialization Proxy Pattern, check out our detailed guide Serialization in Immutable Classes in Java.”

            Thread Safety

            • Even with defensive copies, if you mistakenly expose a mutable reference, multiple threads can still modify the object → immutability breaks.
            • Always validate return values and constructor inputs.

            📌 Quick Rules

            • Always deep copy mutable objects in both constructor and getters.
            • Prefer unmodifiable wrappers if deep copy is too costly.
            • Check nested mutable objects (not just top-level fields).
            • Use immutable alternatives whenever possible (LocalDate instead of Date, List.of() instead of ArrayList, etc.).

            🔄 Deep Copy vs Unmodifiable Wrapper vs Immutable Alternative

            ApproachDescriptionProsConsBest Use Case
            Deep CopyCreates a completely new copy of the mutable object (including nested objects).✅ Guarantees full immutability
            ✅ Safe from external modification
            ❌ Performance overhead (memory & CPU)
            ❌ Complex for deep/nested structures
            When you must protect complex mutable data (e.g., deep object graphs, List<Person>)
            Unmodifiable WrapperWraps a mutable object in an unmodifiable view (Collections.unmodifiableList()).✅ Lightweight
            ✅ Prevents modification through returned collection
            ✅ Faster than deep copy
            ❌ Underlying collection can still change if reference is modified elsewhereWhen you only need to prevent external changes, not full immutability
            Immutable AlternativeUse built-in immutable types (String, LocalDate, List.of(), Map.of()).✅ No need for copying
            ✅ Thread-safe by design
            ✅ Cleaner code
            ❌ Not always available (older Java versions)
            ❌ May not cover all use cases
            Prefer whenever possible (dates, simple collections, constants)

            Real-World Example: Department Class with Immutable Handling

            Suppose we have a Department that holds a list of employee names. We’ll implement immutability using:

            1. Deep Copy
            2. Unmodifiable Wrapper
            3. Immutable Alternative

            1️⃣ Deep Copy Approach

            import java.util.ArrayList;
            import java.util.List;
            
            public final class DepartmentDeepCopy {
              private final List < String > employees;
            
              public DepartmentDeepCopy(List < String > employees) {
                // Deep copy the list
                this.employees = new ArrayList < >(employees);
              }
            
              public List < String > getEmployees() {
                // Return a new copy each time
                return new ArrayList < >(employees);
              }
            
              @Override
              public String toString() {
                return "DepartmentDeepCopy{" + "employees=" + employees + '}';
              }
            }

            ✅ Fully immutable, but copying occurs both in constructor and getter → overhead for large lists.

            2️⃣ Unmodifiable Wrapper Approach

            import java.util.ArrayList;
            import java.util.Collections;
            import java.util.List;
            
            public final class DepartmentUnmodifiable {
              private final List < String > employees;
            
              public DepartmentUnmodifiable(List < String > employees) {
                // Copy once, then wrap
                this.employees = Collections.unmodifiableList(new ArrayList < >(employees));
              }
            
              public List < String > getEmployees() {
                // Safe to return directly (already unmodifiable)
                return employees;
              }
            
              @Override
              public String toString() {
                return "DepartmentUnmodifiable{" + "employees=" + employees + '}';
              }
            }

            ✅ Lightweight and prevents modification via returned list.
            ⚠️ But if the original employees list passed to the constructor is later modified, it won’t affect this class (because of the copy) → safe.

            3️⃣ Immutable Alternative (Java 9+)

            import java.util.List;
            
            public final class DepartmentImmutableAlt {
              private final List < String > employees;
            
              public DepartmentImmutableAlt(List < String > employees) {
                // Directly create an immutable list
                this.employees = List.copyOf(employees);
              }
            
              public List < String > getEmployees() {
                return employees; // already immutable
              }
            
              @Override
              public String toString() {
                return "DepartmentImmutableAlt{" + "employees=" + employees + '}';
              }
            }

            ✅ No need for manual copying or wrapping.
            ✅ Simple and efficient.
            ⚠️ Requires Java 9+ (List.copyOf() or List.of()).


            🔎 Testing All Three

            import java.util.ArrayList;
            import java.util.List;
            
            public class MainTest {
                public static void main(String[] args) {
                    List<String> employees = new ArrayList<>();
                    employees.add("Alice");
                    employees.add("Bob");
            
                    DepartmentDeepCopy dept1 = new DepartmentDeepCopy(employees);
                    DepartmentUnmodifiable dept2 = new DepartmentUnmodifiable(employees);
                    DepartmentImmutableAlt dept3 = new DepartmentImmutableAlt(employees);
            
                    System.out.println(dept1);
                    System.out.println(dept2);
                    System.out.println(dept3);
            
                    // Try modifying original list
                    employees.add("Charlie");
            
                    System.out.println("After modifying original list:");
                    System.out.println(dept1); // Unchanged
                    System.out.println(dept2); // Unchanged
                    System.out.println(dept3); // Unchanged
            
                    // Try modifying through getter
                    try {
                        dept1.getEmployees().add("David"); // modifies copy only
                        dept2.getEmployees().add("David"); // throws UnsupportedOperationException
                        dept3.getEmployees().add("David"); // throws UnsupportedOperationException
                    } catch (Exception e) {
                        System.out.println("Exception: " + e);
                    }
            
                    System.out.println("Final states:");
                    System.out.println(dept1);
                    System.out.println(dept2);
                    System.out.println(dept3);
                }
            }
            

            ✅ Output :

            DepartmentDeepCopy{employees=[Alice, Bob]}
            DepartmentUnmodifiable{employees=[Alice, Bob]}
            DepartmentImmutableAlt{employees=[Alice, Bob]}
            After modifying original list:
            DepartmentDeepCopy{employees=[Alice, Bob]}
            DepartmentUnmodifiable{employees=[Alice, Bob]}
            DepartmentImmutableAlt{employees=[Alice, Bob]}
            Exception: java.lang.UnsupportedOperationException
            Final states:
            DepartmentDeepCopy{employees=[Alice, Bob]}
            DepartmentUnmodifiable{employees=[Alice, Bob]}
            DepartmentImmutableAlt{employees=[Alice, Bob]}
          • Java 25: Compact Source Files and Instance Main Methods (JEP 512)

            Java 25 finalizes JEP 512, which makes small programs far less noisy: you can write a main as an instance method (no static required) and you can write compact source files — source files that implicitly declare a class for any top-level fields and methods. A light-weight java.lang.IO helper is available for beginner-friendly console I/O, and compact source files automatically gain access to java.base classes to reduce imports.

            1. Intro — why this matters

            For decades the first Java program looked like a barrier:

            public class HelloWorld {
                public static void main(String[] args) {
                    System.out.println("Hello, World!");
                }
            }

            That ceremony taught important concepts, but it also made the very first step into Java harder than necessary. JEP 512 gives a safe, compatible on-ramp: small programs can now be written with far less boilerplate while still being ordinary Java and fully upgradable into “real” Java classes as needed. This change is finalized in JDK 25.


            2. What changed (short list)

            • Compact source files: a source file that contains top-level fields and methods (not inside a class) is treated as implicitly declaring a final top-level class whose members are those fields/methods. The class is unnamed and lives in the unnamed package/module. The compiler enforces that the file must have a launchable main.
            • Instance main methods: main may be declared as an instance method (for example void main() or void main(String[] args)); when needed the launcher will instantiate the class and invoke the instance main. This reduces the mental load of public static void main(String[] args).
            • java.lang.IO helper: a small console I/O helper (methods like IO.println(...) and IO.readln(...)) is provided in java.lang for convenience and is therefore available without imports. Its implementation uses System.out/System.in. Note: the static methods are not implicitly statically imported into compact source files — you call them as IO.println(...).
            • Automatic java.base import in compact files: compact source files act as if the entire java.base module were imported on demand — common classes like List, Map, BigInteger, etc., are directly usable without an explicit import.

            2. Compact Source Files

            Before Java 25, every program must be inside a class, and the entry point was always:

            public class HelloWorld {
                public static void main(String[] args) {
                    System.out.println("Hello, World!");
                }
            }

            This was verbose for small demos or scripts.

            👉 With compact source files, you can now write top-level methods and fields directly in a .java file. The compiler automatically wraps them inside an implicit final class behind the scenes.

            Example 1: Hello World in a compact source file

            // Hello.java
            void main() {
                IO.println("Hello, World!");
            }

            Run it directly:

            java Hello.java

            Output:

            Hello, World!

            ➡️ No class, no static, no public. Just a simple entry point.

            Example 2: Using fields and helper methods

            You can declare fields and helper methods at the top level. They all become members of the implicit class.

            // Greet.java
            String greeting = "Welcome to Java 25!";
            
            String shout(String text) {
                return text.toUpperCase();
            }
            
            void main() {
                IO.println(shout(greeting));
            }

            Run:

            java Greet.java
            

            Output:

            WELCOME TO JAVA 25!

            ➡️ The compiler internally creates an unnamed class with greeting and shout as members.

            3. Instance main Methods

            Traditionally, Java only supported:

            public static void main(String[] args)

            With Java 25, you can now declare main as an instance method.

            Example 3: Instance main without arguments

            // Greeter.java
            class Greeter {
                void main() {
                    IO.println("Hello from an instance main!");
                }
            }

            Run:

            java Greeter.java

            Output:

            Hello from an instance main!

            ➡️ The launcher automatically creates an object of Greeter and invokes its main.

            Example 4: Instance main with arguments

            // Echo.java
            class Echo {
                void main(String[] args) {
                    for (var arg : args) {
                        IO.println("Arg: " + arg);
                    }
                }
            }

            Run:

            java Echo.java one two three

            Output:

            Arg: one
            Arg: two
            Arg: three

            ➡️ Both static and instance forms are supported:

            • void main()
            • void main(String[] args)

            4. IO Console Helper

            To make small programs even simpler, Java 25 introduces java.lang.IO, a helper class for console input/output.

            • Before Java 25: System.out.println("Hello, Java!");
            • Now: IO.println("Hello, Java!");

            Example 5: Using IO helper

            void main() {
                IO.println("Enter your name: ");
                String name = IO.readln();
                IO.println("Hello, " + name + "!");
            }

            Run and interact:

            Enter your name: 
            Ashish
            Hello, Ashish!

            ➡️ No need to remember System.out or set up a Scanner.

            5. Automatic Imports

            In compact source files, common Java APIs from java.base (like List, Map, BigInteger) are automatically available without import.

            // Numbers.java
            void main() {
                var numbers = List.of(10, 20, 30);
                IO.println("Numbers: " + numbers);
            }
            

            No import java.util.List; needed.

            6. How Compact Source Evolves into a Class

            Compact source files are not a new language, they’re just a shortcut.
            You can always “grow” them into normal Java classes.

            Compact form:

            void main() {
                IO.println("Quick start in Java 25!");
            }

            Expanded form:

            class QuickStart {
                void main() {
                    IO.println("Quick start in Java 25!");
                }
            }

            This ensures seamless transition from beginner scripts to full OOP programs.

            7. Important gotchas & notes

            • Implicit class is unnamed and final — the compiler generates a name you must not rely on in source code; you cannot new the implicitly-declared class from within the file. It’s meant as an entry-point, not a reusable API.
            • IO helper methods not implicitly imported as bare names — you must call IO.println(...) (they live in java.lang so no import is needed, but static implicit import into compact files was intentionally removed).
            • No statements outside methods — compact source files still require methods (you cannot write top-level statements that are executed as a script body; the design requires methods and fields so programs can grow).
            • Launcher lookup rules — if a classic public static void main(String[]) exists it retains priority; instance main paths are fallbacks or alternatives. See the JEP/JVM spec for exact lookup semantics.

            8. Compatibility & tooling

            • JEP 512 was finalized for JDK 25; tooling (IDE support, linters) are already adding support (IntelliJ and other vendors published guidance shortly after the release). If your build tools or CI assume public static void main always exists, you may want to update them to accept instance mains or use explicit javac + java steps.

            9. Summary of Changes (JEP 512)

            FeatureBefore Java 25Java 25+ (JEP 512)
            Entry point declarationpublic static void main(String[] args)void main() or void main(String[] args) (static or instance)
            Class requirementExplicit public class ...Implicit class (no explicit declaration)
            Console I/OSystem.out.println with importsIO.println (available without import)
            Import statementsManual for core APIsAuto-import for java.base in compact files

            👉 Read more: