In this Java program, we will learn how to print the Fibonacci series using both a traditional Java approach and Java 8 features.
The Fibonacci series is a sequence in which each number is the sum of the previous two numbers.
For example:
0 1 1 2 3 5 8 13 21 34
1. Normal Java Program
import java.util.Scanner;

public class FibonacciSeries {
    public static void main(String[] args) {
        Scanner sc = new Scanner(System.in);
        System.out.print("Enter the number of terms: ");
        int n = sc.nextInt();
        int first = 0;
        int second = 1;
        System.out.println("Fibonacci Series:");
        for (int i = 1; i <= n; i++) {
            System.out.print(first + " ");
            int next = first + second;
            first = second;
            second = next;
        }
        sc.close();
    }
}
Output
Enter the number of terms: 10
Fibonacci Series:
0 1 1 2 3 5 8 13 21 34
Explanation
The program starts with two numbers:
int first = 0;
int second = 1;
Inside the for loop, the next Fibonacci number is calculated by adding the previous two numbers:
int next = first + second;
The values are then updated:
first = second;
second = next;
This process continues until the requested number of terms is printed.
2. Java 8 Program to Print Fibonacci Series
Java 8 introduced the Stream API, which can be used to generate a Fibonacci series in a more functional programming style.
import java.util.Scanner;
import java.util.stream.Stream;

public class FibonacciJava8 {
    public static void main(String[] args) {
        Scanner sc = new Scanner(System.in);
        System.out.print("Enter the number of terms: ");
        int n = sc.nextInt();
        System.out.println("Fibonacci Series:");
        Stream.iterate(
                new long[]{0, 1},
                f -> new long[]{f[1], f[0] + f[1]}
        )
        .limit(n)
        .forEach(f -> System.out.print(f[0] + " "));
        sc.close();
    }
}
Output
Enter the number of terms: 10
Fibonacci Series:
0 1 1 2 3 5 8 13 21 34
Explanation of Java 8 Program
The Java 8 version uses Stream.iterate() to generate Fibonacci numbers.
Stream.iterate(
    new long[]{0, 1},
    f -> new long[]{f[1], f[0] + f[1]}
)
The array stores two consecutive Fibonacci numbers.
For every iteration:
The first value becomes the second value.
The second value becomes the sum of the two previous values.
The limit(n) method controls how many Fibonacci terms are generated:
.limit(n)
Finally, forEach() prints each generated value:
.forEach(f -> System.out.print(f[0] + " "));
Here, f -> is a Java 8 lambda expression.
Difference Between Normal Java and Java 8
Feature
Normal Java
Java 8
Approach
for loop
Stream API
Java 8 feature
No
Stream.iterate()
Lambda expression
No
Yes
Easy for beginners
Yes
Moderate
Performance
Simple and efficient
More functional style
Which Approach Should You Use?
For beginners and general-purpose Java programming, the normal for loop approach is recommended because it is easier to understand and maintain.
The Java 8 version is useful for learning how the Stream API and lambda expressions can be applied to sequence generation.
Conclusion
The Fibonacci series is a common Java programming problem used in coding interviews and programming exercises. The traditional approach uses a loop and variables, while the Java 8 approach demonstrates how Streams and Lambda expressions can generate the same sequence.
In this Java program, we will learn how to check whether a number is odd or even without using the modulus (%) operator.
The program uses the bitwise AND (&) operator. In binary representation, an even number always has 0 as its least significant bit, while an odd number has 1.
1. Normal Java Program
import java.util.Scanner;

public class OddEvenWithoutOperator {
    public static void main(String[] args) {
        Scanner sc = new Scanner(System.in);
        System.out.print("Enter a number: ");
        int number = sc.nextInt();
        if ((number & 1) == 0) {
            System.out.println(number + " is Even");
        } else {
            System.out.println(number + " is Odd");
        }
        sc.close();
    }
}
Output
Enter a number: 10
10 is Even
Explanation
The expression:
number & 1
checks the least significant bit of the number.
For example:
10 = 1010
 1 = 0001
-----------
&   0000
Since the result is 0, 10 is even.
For an odd number:
11 = 1011
 1 = 0001
-----------
&   0001
The result is 1, so 11 is odd.
2. Java 8 Program
In Java 8, we can use a lambda expression with the Function functional interface to perform the same operation.
import java.util.Scanner;
import java.util.function.Function;

public class OddEvenJava8 {
    public static void main(String[] args) {
        Scanner sc = new Scanner(System.in);
        System.out.print("Enter a number: ");
        int number = sc.nextInt();
        Function<Integer, String> checkOddEven =
                n -> (n & 1) == 0 ? "Even" : "Odd";
        System.out.println(number + " is " + checkOddEven.apply(number));
        sc.close();
    }
}
Output
Enter a number: 15
15 is Odd
Explanation of Java 8 Program
The Java 8 version uses the functional interface:
Function<Integer, String>
The lambda expression performs the odd/even check:
n -> (n & 1) == 0 ? "Even" : "Odd"
The ternary operator returns "Even" when the result of (n & 1) is 0; otherwise, it returns "Odd".
The function is executed using:
checkOddEven.apply(number)
Difference Between Normal Java and Java 8
Feature
Normal Java
Java 8
Approach
if-else
Lambda expression
Modulus %
Not used
Not used
Bitwise operator
&
&
Java 8 feature
No
Function + Lambda
Beginner friendly
Yes
More advanced
Important Note
The phrase “without operator” can be interpreted in different ways.
The programs above do not use the modulus (%) operator, which is the usual meaning of this Java programming question. They do use the bitwise AND (&) operator.
If the requirement is to check odd/even without using any arithmetic or bitwise operator at all, a different approach is required.
Conclusion
Using (number & 1) is an efficient way to determine whether an integer is odd or even without using the modulus operator. The normal Java version is easier for beginners, while the Java 8 version demonstrates the use of lambda expressions and functional interfaces
In this Java program, we will learn how to check whether a given number is odd or even using the modulo (%) operator.
1. Normal Java Program
import java.util.Scanner;

public class OddEven {
    public static void main(String[] args) {
        Scanner sc = new Scanner(System.in);
        System.out.print("Enter a number: ");
        int number = sc.nextInt();
        if (number % 2 == 0) {
            System.out.println(number + " is Even");
        } else {
            System.out.println(number + " is Odd");
        }

        sc.close();
    }
}
Output
Enter a number: 10
10 is Even
Explanation
The modulo operator % returns the remainder after division.
number % 2
If the remainder is 0, the number is even. Otherwise, the number is odd.
2. Java 8 Program
Java 8 introduced features such as Lambda expressions and functional interfaces. We can use a lambda expression to perform the odd/even check.
import java.util.Scanner;
import java.util.function.Function;

public class OddEvenJava8 {
    public static void main(String[] args) {
        Scanner sc = new Scanner(System.in);
        System.out.print("Enter a number: ");
        int number = sc.nextInt();
        Function<Integer, String> checkOddEven =
                n -> n % 2 == 0 ? "Even" : "Odd";
        System.out.println(number + " is " + checkOddEven.apply(number));
        sc.close();
    }
}
Output
Enter a number: 15
15 is Odd
Explanation
In the Java 8 version, we use the Function<T, R> functional interface:
Function<Integer, String>
The lambda expression:
n -> n % 2 == 0 ? "Even" : "Odd"
checks whether the number is divisible by 2.
The ternary operator:
condition ? valueIfTrue : valueIfFalse
returns "Even" when the condition is true; otherwise, it returns "Odd".
The result is obtained using:
checkOddEven.apply(number)
Difference Between Normal Java and Java 8
Feature
Normal Java
Java 8
Approach
if-else
Lambda expression
Operator
%
%
Input
Scanner
Scanner
Java Version
All common versions
Java 8+
Complexity
Simple
Slightly more advanced
Best for beginners
Yes
Good for learning Java 8
Conclusion
The normal if-else approach is recommended for beginners because it is simple and easy to understand. The Java 8 version demonstrates how a lambda expression and functional interface can be used for the same task.
In this Java program, we will learn how to find the largest number among three numbers entered by the user using the if-else statement.
Java Program
import java.util.Scanner;

public class LargestAmongThree {
    public static void main(String[] args) {
        Scanner sc = new Scanner(System.in);
        System.out.print("Enter first number: ");
        int num1 = sc.nextInt();
        System.out.print("Enter second number: ");
        int num2 = sc.nextInt();
        System.out.print("Enter third number: ");
        int num3 = sc.nextInt();
        int largest;
        if (num1 >= num2 && num1 >= num3) {
            largest = num1;
        } else if (num2 >= num1 && num2 >= num3) {
            largest = num2;
        } else {
            largest = num3;
        }
        System.out.println("Largest number = " + largest);
        sc.close();
    }
}
Output
Enter first number: 25
Enter second number: 40
Enter third number: 15
Largest number = 40
Explanation
The program accepts three numbers from the user using the Scanner class.
The if-else if-else statement compares the three numbers:
if (num1 >= num2 && num1 >= num3)
If num1 is greater than or equal to both other numbers, it is the largest.
Similarly, the program checks num2. If neither num1 nor num2 is the largest, then num3 is considered the largest.
The && operator is used to check multiple conditions at the same time.
Key Points
Scanner is used to accept input from the user.
if-else is used to compare three numbers.
The && logical operator combines multiple conditions.
The program works with Java 8 and later versions.
Conclusion
This Java program demonstrates how to compare three numbers and find the largest number using conditional statements.
Using Java 8
For Java 8, you can write it using the Math.max() method. This is shorter and cleaner than multiple if-else statements.
Java 8: Program to Find the Largest Among Three Numbers
import java.util.Scanner;

public class LargestAmongThree {
    public static void main(String[] args) {
        Scanner sc = new Scanner(System.in);
        System.out.print("Enter first number: ");
        int num1 = sc.nextInt();
        System.out.print("Enter second number: ");
        int num2 = sc.nextInt();
        System.out.print("Enter third number: ");
        int num3 = sc.nextInt();
        int largest = Math.max(num1, Math.max(num2, num3));
        System.out.println("Largest number = " + largest);
        sc.close();
    }
}
Output
Enter first number: 25
Enter second number: 40
Enter third number: 15
Largest number = 40
Explanation
Java provides the Math.max() method to find the larger of two numbers.
Math.max(num2, num3)
First, it finds the larger value between num2 and num3. Then that result is compared with num1:
Math.max(num1, Math.max(num2, num3))
This gives the largest number among all three numbers.
In this Java program, we will learn how to add two numbers entered by the user and display their sum using the Scanner class.
Java Program
import java.util.Scanner;

public class AdditionOfTwoNumbers {
    public static void main(String[] args) {
        Scanner sc = new Scanner(System.in);
        System.out.print("Enter first number: ");
        int num1 = sc.nextInt();
        System.out.print("Enter second number: ");
        int num2 = sc.nextInt();
        int sum = num1 + num2;
        System.out.println("Sum = " + sum);
        sc.close();
    }
}
Output
Enter first number: 25
Enter second number: 15
Sum = 40
Explanation
The program uses the Scanner class to accept two numbers from the user.
int num1 = sc.nextInt();
int num2 = sc.nextInt();
The + operator is then used to add the two numbers:
int sum = num1 + num2;
Finally, the result is displayed using System.out.println().
Key Points
Scanner is used to read numbers from the user.
The + operator performs addition.
The result is stored in the sum variable.
System.out.println() displays the final result.
Conclusion
This simple Java program demonstrates how to take two numbers as input, perform addition, and display the result.
In this Java program, we will learn how to print the multiplication table of a given number using a for loop.
Java Program
import java.util.Scanner;

public class MultiplicationTable {
    public static void main(String[] args) {
        Scanner sc = new Scanner(System.in);
        System.out.print("Enter a number: ");
        int num = sc.nextInt();
        for (int i = 1; i <= 10; i++) {
            System.out.println(num + " x " + i + " = " + (num * i));
        }
        sc.close();
    }
}
Output
Enter a number: 5
5 x 1 = 5
5 x 2 = 10
5 x 3 = 15
5 x 4 = 20
5 x 5 = 25
5 x 6 = 30
5 x 7 = 35
5 x 8 = 40
5 x 9 = 45
5 x 10 = 50
Explanation
The program first takes a number from the user using the Scanner class.
int num = sc.nextInt();
A for loop is then used to generate the multiplication table from 1 to 10:
for (int i = 1; i <= 10; i++)
Inside the loop, the number is multiplied by the current value of i:
num * i
The result is displayed using System.out.println().
Key Points
Scanner is used to read input from the user.
A for loop generates the multiplication table.
The table is printed from 1 to 10.
The multiplication result is calculated using the * operator.
Conclusion
This simple Java program demonstrates how to use user input, a for loop, and arithmetic multiplication to generate a multiplication table.
2. Java 8 Program
import java.util.Scanner;
import java.util.stream.IntStream;

public class MultiplicationTable {
    public static void main(String[] args) {
        Scanner sc = new Scanner(System.in);
        System.out.print("Enter a number: ");
        int number = sc.nextInt();
        IntStream.rangeClosed(1, 10)
                 .forEach(i -> System.out.println(
                         number + " x " + i + " = " + (number * i)
                 ));
        sc.close();
    }
}
Output
Enter a number: 5
5 x 1 = 5
5 x 2 = 10
5 x 3 = 15
5 x 4 = 20
5 x 5 = 25
5 x 6 = 30
5 x 7 = 35
5 x 8 = 40
5 x 9 = 45
5 x 10 = 50
Explanation
The program first accepts a number from the user using the Scanner class.
int number = sc.nextInt();
Java 8’s IntStream.rangeClosed() is then used to generate numbers from 1 to 10:
IntStream.rangeClosed(1, 10)
The forEach() method processes each number in the stream:
.forEach(i -> System.out.println(
    number + " x " + i + " = " + (number * i)
));
Here, the lambda expression i -> is a Java 8 feature. For every value of i, the program multiplies it by the input number and prints the result.
Key Points
IntStream is part of the Java 8 Stream API.
rangeClosed(1, 10) generates numbers from 1 through 10.
forEach() processes each value.
Lambda expressions are used to print the multiplication table.
The program is compatible with Java 8 and later versions.
Conclusion
This Java 8 program demonstrates how Streams and Lambda expressions can be used to generate a multiplication table in a concise and modern way.
In this Java program, we will learn how to print a semicolon (;) without using a semicolon anywhere in the program.
This is a common Java programming puzzle and interview question that demonstrates how Java expressions can be used inside control statements.
Java Program
public class PrintSemicolon {
    public static void main(String[] args) {
        if (System.out.printf("%c", 59) != null) {
        }
    }
}
Output
;
Explanation
The ASCII value of the semicolon character (;) is 59.
; → ASCII value = 59
We use the following statement:
System.out.printf("%c", 59)
The %c format specifier tells printf() to print the value as a character. Therefore, 59 is printed as the semicolon character.
The interesting part is that we don’t write the printf() call as a normal statement. Instead, we place it inside an if condition:
if (System.out.printf("%c", 59) != null) {
}
An if condition is an expression and does not require a semicolon at the end. printf() returns a PrintStream object, so its result can be compared with null.
As a result, the semicolon is printed without using a semicolon to terminate the statement.
Key Points
The ASCII value of ; is 59.
%c is used to print a character.
System.out.printf() returns a PrintStream object.
The printf() call is placed inside an if condition.
The program contains no semicolon character (;) in the source code.
Note: This is a programming puzzle rather than a recommended coding practice. In normal Java programs, semicolons should be used wherever the Java syntax requires them.
Yes. In Java, we can write a class without explicitly defining a main() method. For example, using a static initializer block:
In older Java versions, you could use a static block:
class JavaKnowledgeBase{
    static {
        System.out.println("Java Knowledge Base");
        System.exit(0);
    }
}
Traditionally, this could execute the static block when the class is initialized, but modern Java versions require a main method when launching a class directly. So this is not a reliable way to run a standalone program on current Java versions.
How does this work?
Step 1: Class loading
When Java loads the Demo class, it initializes its static members.
This trick is version-dependent and should not be used as a normal Java program technique. In modern Java, launching a class with java Demo expects a valid application entry point (main, subject to the Java version’s launch rules).
So if this is an interview question, you can say:
“Yes, a class can contain executable code in a static initializer without declaring main(), but whether it can be launched directly without main() depends on the Java version. The traditional static-block trick is mainly a historical example.”
So how do we write it in Java 21?
The normal Java 21 program is still:
class JavaKnowledgeBase {
    public static void main(String[] args) {
        System.out.println("Java Knowledge Base");
    }
}
However, Java 21 has a preview feature that allows simpler entry-point syntax. For example:
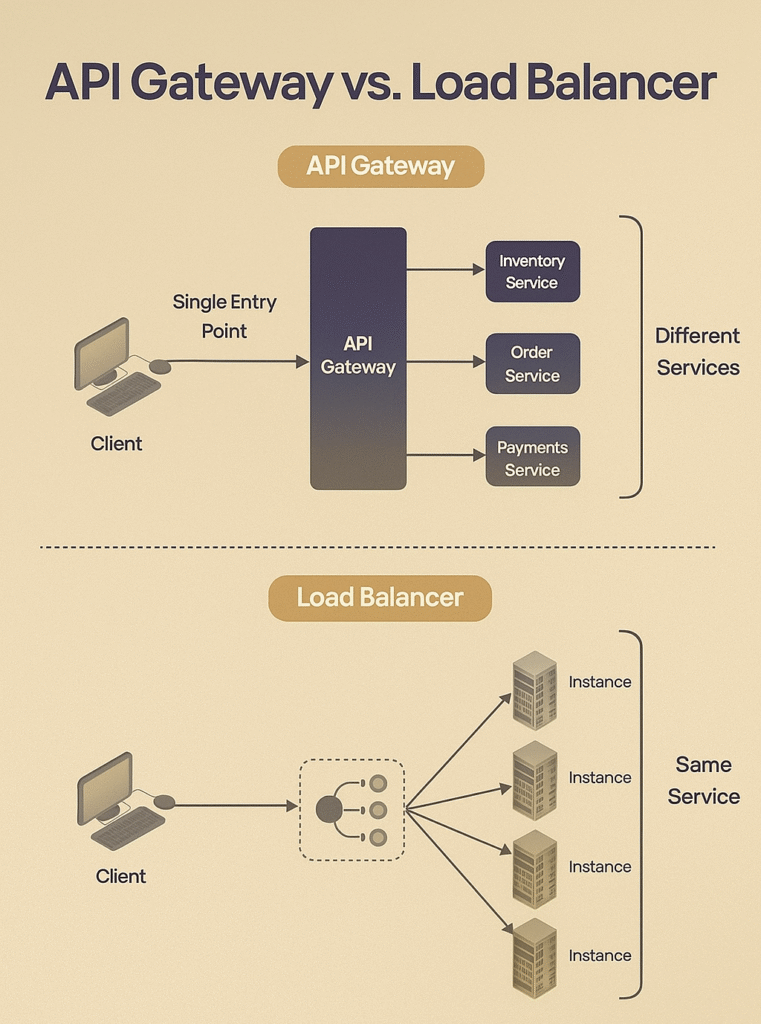
When building scalable and reliable applications, especially in microservices and cloud-native architectures, two terms often come up: API Gateway and Load Balancer.
At first glance, they may seem similar since both sit between the client and backend services. However, they solve different problems and often work together in modern systems.
In this tutorial, we’ll break down the differences, use cases, advantages, and limitations of each.
🔹 What is an API Gateway?
An API Gateway is the single entry point for all client requests in a microservices architecture. Instead of allowing clients to directly call each microservice, the gateway acts as a centralized layer that manages, secures, and routes traffic.
It acts like a “smart postman”—receiving requests, verifying them, and routing them to the appropriate microservice.
🔹 Why Do We Need an API Gateway?
Simplifies Client Interaction
Clients don’t need to know about individual microservices.
Instead of calling /users-service, /orders-service, /payments-service, clients just call /api, and the Gateway routes internally.
Centralized Security
Authentication, authorization, and encryption policies are applied at one place.
Prevents exposing every service directly to the internet.
Decoupling Client from Backend
If microservice endpoints or versions change, only the Gateway updates.
Clients continue using the same unified API.
Cross-Cutting Concerns
Logging, monitoring, caching, and throttling are all handled centrally.
🔹 Key Features of an API Gateway
Routing
Decides which microservice should handle a request.
Example: /api/orders → Order Service, /api/payments → Payment Service.
Authentication & Authorization
Validates user credentials (API keys, JWT, OAuth tokens).
Ensures only authorized clients access protected services.
Rate Limiting / Quota Management
Prevents abuse and DDoS attacks by limiting requests per client or per second.
Maintenance Overhead – Needs constant tuning and scaling.
Single Point of Failure – If the gateway fails, all requests fail.
Increased Complexity – More moving parts to maintain.
Performance Bottleneck – Adds an extra network hop.
🖼 Example:
A client calls /orders, the API Gateway authenticates the request, checks rate limits, and then routes it to the Order Service.
🔹 What is a Load Balancer?
A Load Balancer is a networking component that sits between the client and the server pool. Its main role is to distribute incoming traffic across multiple servers that provide the same service.
Without a Load Balancer, a single server may become overwhelmed when too many requests arrive simultaneously. With a Load Balancer, traffic is intelligently divided, ensuring:
Performance → users experience faster and more consistent response times
Scalability → more servers can be added to handle more traffic.
Availability → if one server fails, traffic is redirected to healthy servers.
📌 Key Analogy: Think of a ticket counter at a movie theatre. Instead of everyone lining up at one counter, multiple counters are available. A supervisor (the Load Balancer) directs each new customer to the counter with the shortest line.
🔹 Why Do We Need a Load Balancer?
Prevent Overloading → No single server is overwhelmed.
Improve User Experience → Faster response times due to balanced load.
Enable Horizontal Scaling → Easily add/remove servers without downtime.
Fault Tolerance → If one server crashes, requests go to healthy servers.
Disaster Recovery → Can route traffic to a backup data center if the primary fails.
🔹 How Load Balancers Work:
Client Request → A user sends a request (e.g., open a website).
Load Balancer Receives It → Instead of hitting a single server, the request first arrives at the Load Balancer.
Health Check → The Load Balancer checks which servers are healthy and available.
Routing Decision → It applies an algorithm (e.g., Round Robin, Least Connections) to choose a server.
Forwarding Request → The request is forwarded to the chosen server.
Response Back → The server processes the request and sends the response back to the client (sometimes directly, sometimes via the Load Balancer).
🔄 Load Balancing Algorithms:
Round Robin: Requests are distributed sequentially.
Least Connections: Sends traffic to the server with the fewest active connections.
IP Hash: Routes requests based on client IP.
Least Response Time: Sends traffic to the fastest responding server.
✅ 🔹 Advantages of Load Balancers
✅ Scalability – Easily add/remove servers without downtime.
✅ High Availability – Routes traffic only to healthy servers.
Distributes requests by resolving DNS to different server IPs.
Example: AWS Route 53, Cloudflare Load Balancer.
Best for: Global traffic routing across multiple regions.
🔹 API Gateway vs Load Balancer – Key Differences
Feature
API Gateway 📨
Load Balancer ⚖️
Purpose
Routes to different services
Routes to same service instances
Scope
Microservices management
Traffic distribution
Functions
Auth, rate limiting, caching, logging
Routing, health checks, fault tolerance
Layer
Application (L7)
Network (L4) or Application (L7)
Example
Kong, Apigee, AWS API Gateway
Nginx, HAProxy, AWS ALB/NLB
🔹 When to Use Which?
Choosing between an API Gateway and a Load Balancer depends on the architecture, goals, and type of application you’re building. Let’s explore both in detail:
✅ Use API Gateway If:
You are building a Microservices Architecture
In a microservices setup, exposing each microservice (Order, Payment, Inventory, etc.) directly to clients is inefficient and insecure.
An API Gateway provides a single unified entry point so clients don’t need to know the internal microservice structure.
Example: In an e-commerce platform, the client just calls /checkout, while the API Gateway internally routes requests to the Order Service, Payment Service, and Inventory Service.
You need Authentication & Security
Clients shouldn’t directly handle tokens or authentication with every microservice.
The API Gateway centralizes JWT validation, OAuth, API keys, and enforces security policies before forwarding requests.
Example: In a banking app, the API Gateway validates customer tokens and ensures only authorized requests reach the Accounts Service or Transactions Service.
You need Rate Limiting or Quota Management
To prevent abuse (like DDoS or excessive API calls), the API Gateway enforces rate limits per client or per API key.
Example: In a SaaS product, the free tier is limited to 1000 requests/day, while the premium tier gets unlimited access—this is managed at the API Gateway level.
You want Protocol Translation
Sometimes clients speak REST, but services run on gRPC, SOAP, or WebSockets.
The API Gateway converts requests/responses between protocols.
Example: A mobile app communicates over REST, while backend services talk over gRPC—the gateway handles translation.
You want Response Caching & Performance Optimization
Frequently accessed results (e.g., top products list) can be cached at the gateway to reduce latency.
Example: An online news platform caches the latest headlines at the API Gateway, avoiding repeated calls to backend services.
✅ Use Load Balancer If:
You want to Scale Your Application Horizontally
When a single server can’t handle all requests, multiple identical instances are deployed.
The Load Balancer spreads traffic across them.
Example: A social media app runs 50 web servers behind a Load Balancer—so millions of users can be served seamlessly.
You need High Availability & Fault Tolerance
Load Balancers perform health checks and stop sending traffic to failed servers.
If one instance crashes, the Load Balancer routes traffic only to healthy ones.
Example: In a video streaming platform, if one server goes down, the Load Balancer instantly redirects users to working servers—ensuring no downtime.
You want Efficient Resource Utilization
Load Balancers use algorithms (Round Robin, Least Connections, IP Hash) to evenly distribute requests.
This ensures no server is overloaded while others remain idle.
Example: An online exam portal during peak hours balances load across multiple servers so no single node slows down.
You want Global Traffic Management
Some load balancers work at DNS level (e.g., AWS Route 53, Cloudflare Load Balancer) to direct users to the nearest or healthiest region.
Example: A global e-commerce site sends US users to US servers, EU users to EU servers—minimizing latency.
You want to Enhance Network Performance
Load Balancers (especially L7) can do SSL termination, request compression, and even Web Application Firewall (WAF) integration.
Example: In a fintech app, SSL termination at the Load Balancer reduces encryption load on backend servers.
🔹 Putting It Together
API Gateway = Smart traffic controller for different services 👉 Ideal for microservices, authentication, caching, protocol translation.
Load Balancer = Simple traffic distributor for same service instances 👉 Ideal for scaling, availability, resource efficiency.
📌 Best Practice: In most enterprise systems, you’ll use both together.
The Load Balancer ensures requests are spread evenly across multiple server instances.
The API Gateway ensures requests are secure, authenticated, and routed to the correct microservice.
💡 Example: Netflix Architecture
API Gateway (Zuul, now Zuul 2 / Spring Cloud Gateway) → Handles routing, security, throttling.
Load Balancer (Ribbon + AWS ELB) → Ensures millions of users are distributed across multiple backend servers efficiently.
📝 Conclusion
An API Gateway is about managing APIs and microservices.
A Load Balancer is about distributing traffic and ensuring availability.
Together, they form the backbone of modern cloud-native, microservices-driven architectures.
✅ Final Takeaway
Use an API Gateway when you have multiple microservices and need a single entry point with security and routing.
Use a Load Balancer when you have multiple instances of the same service and need scaling and high availability.
In real-world enterprise systems → They complement each other for a robust, secure, and scalable architecture.
In Java, an array is a data structure that allows us to store multiple values of the same type in a single variable. Instead of declaring separate variables for each value, we can group them together into a single collection.
For example:
int rollNo1 = 101;
int rollNo2 = 102;
int rollNo3 = 103;
Here, we had to create 3 different variables. If you want to store 100 student roll numbers, creating 100 variables is impractical.
That’s where arrays come in.
👉 An array can store all the roll numbers in one single variable:
int[] rollNumbers = {101, 102, 103};
Why Do We Need Arrays?
Efficiency – Instead of declaring many variables, we can use one array.
Structured Data Handling – Arrays allow us to loop through values, search, and manipulate them.
Memory Management – Values are stored in contiguous memory locations, making access faster using indices.
Scalability – Easy to manage large data sets compared to handling multiple variables.
Formal Definition
An array in Java is a container object that holds a fixed number of values of a single data type. The length of an array is established when the array is created. After creation, its length is fixed and cannot be changed.
Syntax of Arrays
There are two steps in using arrays:
Declaration – Telling Java that you want an array of a specific type.
Instantiation – Allocating memory for the array.
Initialization – Assigning values to array elements.
Example 3: Declaration + Instantiation + Initialization
int[] numbers = {10, 20, 30, 40, 50};
Accessing Array Elements
Each element of the array is accessed by its index, starting from 0.
System.out.println(numbers[0]); // prints 10
System.out.println(numbers[2]); // prints 30
Memory Allocation of Arrays in Java
When an array is created, Java allocates a contiguous block of memory to store its elements.
Each element is stored sequentially in memory.
The index acts as an offset to calculate the memory address.
Formula: Address of arr[i] = Base Address + (i × Size of each element)
Diagram: 1D Array Memory Representation
Suppose we have:
int[] numbers = {10, 20, 30, 40, 50};
Memory Layout:
Index   →   0     1     2     3     4
Value   →  10    20    30    40    50
Address → 1000  1004  1008  1012  1016   (if int = 4 bytes)
📌 All values are stored sequentially (continuous block). 📌 Fast access: e.g., to access numbers[3], JVM directly jumps to 1000 + (3 × 4) = 1012.
2. Types of Arrays
Single-Dimensional Arrays
int[] arr = {10, 20, 30};
Multi-Dimensional Arrays
int[][] matrix = { {1, 2, 3}, {4, 5, 6} };
Jagged Arrays (array of arrays with different lengths)
int[][] jagged = new int[2][];
jagged[0] = new int[3]; // row 1 → 3 elements
jagged[1] = new int[2]; // row 2 → 2 elements
3. Operations on Arrays
Arrays are simple but powerful. Common array operations you’ll explain in your blog are: traversing, searching, sorting, copying, and insert/delete (resize-like operations). Below each operation I show why it’s done that way, how to do it in Java, the cost (big-O), and common pitfalls.
Examples:
int[][] jagged = new int[2][];
jagged[0] = new int[3]; // row 1 → 3 elements
jagged[1] = new int[2]; // row 2 → 2 elements
3.1) Iterating
Methods
classic for-loop — when you need the index (read/write by index):
int[] arr = {10, 20, 30, 40};
for (int i = 0; i < arr.length; i++) {
    System.out.println("index=" + i + " value=" + arr[i]);
    // you can update: arr[i] = arr[i] + 1;
}
enhanced for-loop (for-each) — simpler when you only need values:
for (int value : arr) {
    System.out.println(value);
}
Use for-each for readability; you can’t change the array slot with the loop variable (it’s a copy for primitives).
while / do-while — same as for but sometimes clearer with external index:
int i = 0;
while (i < arr.length) {
    System.out.println(arr[i++]);
}
import java.util.Arrays;

int[] arr = {1, 2, 3, 4, 5};
Arrays.stream(arr).forEach(System.out::println);

// example: sum of elements > 2
int sum = Arrays.stream(arr)
                .filter(x -> x > 2)
                .sum();
System.out.println(sum); // 12
Complexity
Traversal cost: O(n) where n = arr.length.
When to use which
Need index → classic for or while.
Just values → enhanced for.
Aggregation/filtering → Streams.
3.2) Searching
Two typical searches: linear search and binary search.
Linear Search
Scans elements one-by-one.
Works on unsorted arrays.
Code:
public static int linearSearch(int[] arr, int target) {
    for (int i = 0; i < arr.length; i++) {
        if (arr[i] == target) return i; // found index
    }
    return -1; // not found
}
Use parallelSort for large arrays when parallelism helps (multi-core).
Notes & best practices
After sorting, you can reliably use Arrays.binarySearch.
For objects, sorting is stable when using object sort (equal elements keep relative order); if your algorithm depends on stability, mention that in your blog.
Sorting modifies the array in-place.
3.4) Copying arrays (and resizing)
Arrays have fixed length. To “resize” you create a new array and copy elements into it.
Methods to copy
System.arraycopy(src, srcPos, dest, destPos, length) — fast native copy.
int[] src = {1,2,3,4};
int[] dest = new int[6];
System.arraycopy(src, 0, dest, 0, src.length);
System.out.println(Arrays.toString(dest)); // [1,2,3,4,0,0]
Arrays.copyOf(original, newLength) — convenient; copies starting from 0:
int[] a = {1,2};
int[] b = a.clone(); // new array with same contents
Shallow vs deep copy (object arrays)
For String[] or Integer[] (immutable), shallow copy is fine.
For arrays of mutable objects, copying copies references, not the object internals.
class Person { String name; }
Person[] p1 = new Person[] { new Person("A") };
Person[] p2 = p1.clone(); // p2[0] references same Person object as p1[0]
p2[0].name = "B"; // affects p1[0] also
To deep-copy, you must copy each element (e.g., with a clone/copy constructor for the object).
Resizing pattern (common)
int[] arr = {1,2,3};
// need to add a new value → resize:
arr = Arrays.copyOf(arr, arr.length + 1);
arr[arr.length - 1] = 4;
But repeated resizing with arrays is O(n) per resize and expensive. Use ArrayList when you need frequent dynamic resizing.
Complexity
Copying: O(n) (must copy each element).
3.5) Insertions & Deletions (shifting)
Arrays are fixed-size, so add/remove require copying or shifting.
Deleting an element at index pos (shift left)
public static int[] deleteAt(int[] arr, int pos) {
    if (pos < 0 || pos >= arr.length) throw new IndexOutOfBoundsException();
    int[] res = new int[arr.length - 1];
    System.arraycopy(arr, 0, res, 0, pos);                 // left chunk
    System.arraycopy(arr, pos + 1, res, pos, arr.length - pos - 1); // right chunk
    return res;
}
Inserting at index pos (shift right)
public static int[] insertAt(int[] arr, int pos, int value) {
    int[] res = Arrays.copyOf(arr, arr.length + 1);
    System.arraycopy(res, pos, res, pos + 1, arr.length - pos); // shift right
    res[pos] = value;
    return res;
}
Cost: insertion or deletion = O(n) due to shifting/copying.
Tip: For many inserts/removes, use ArrayList<Integer> — amortized O(1) append, O(n) insert/remove in middle, but resizing grows exponentially so fewer real copies.
int[] a = {3,1,2};
Arrays.sort(a);
System.out.println(Arrays.toString(a)); // [1,2,3]
int idx = Arrays.binarySearch(a, 2); // 1
4. Advantages and Disadvantages of Arrays
Advantages of Arrays
✅ Easy to use. ✅ Store multiple values of the same type. ✅ Continuous memory (fast access using index). ✅ Useful in low-level data handling and algorithms.
Disadvantages of Arrays
❌ Fixed size (cannot grow/shrink dynamically). ❌ Cannot store different data types in one array. ❌ Insertions & deletions are costly (need shifting). ❌ Wastage of memory if array size > required. ❌ Lack of built-in methods compared to collections.
5. Why Collections Framework When Arrays Already Exist?
Arrays are fundamental in Java, but they come with serious limitations:
Fixed Size → Once you create an array, its size cannot grow or shrink. If you need a bigger array, you must create a new one and copy the old elements into it.
Limited Utility Methods → Arrays have very few built-in operations. For example, you cannot directly add or remove elements. You need System.arraycopy() or Arrays.copyOf(), which is cumbersome.
Homogeneous Elements Only → Arrays store only one type of element. You cannot mix types (except by using Object[], but then type-safety is lost).
Insertion & Deletion Costly → Inserting or deleting from the middle of an array requires shifting all subsequent elements, which is inefficient.
No Built-in Data Structures → Arrays don’t provide ready-to-use structures like lists, sets, queues, maps, etc. You must build everything manually on top of arrays.
To overcome these drawbacks, Java introduced the Collections Framework, which provides dynamic, flexible, and feature-rich data structures such as ArrayList, HashSet, HashMap, LinkedList, etc. These are built on top of arrays (or linked nodes), but offer:
Limited functionality. You must write manual code for insertion, deletion, searching, etc.
Rich set of APIs (add, remove, contains, sort, iterator) make operations much easier.
Utility Methods
Very few methods in java.util.Arrays class (sort(), copyOf(), binarySearch(), equals(), etc.).
Hundreds of ready-to-use methods across List, Set, Map, Queue, etc.
Performance
Faster for primitive data types since no wrapper objects are needed. Best when working with small, fixed-size datasets.
Slight overhead due to object wrappers and dynamic resizing. But optimized implementations make them efficient in real-world scenarios.
Flexibility
Very low. No support for dynamic resizing, heterogeneous data, or complex structures.
Very high. Supports Lists, Sets, Maps, Queues, Stacks, etc. Can represent real-world structures more easily.
✍️“Although arrays are powerful, they have fixed size and limited functionality. That’s why Java introduced the Collections Framework, which provides dynamic and flexible data structures such as ArrayList, HashSet, and HashMap. You can read my detailed blog on the Java Collections Framework to understand how it solves the limitations of arrays.”
Conclusion
Arrays in Java are one of the most fundamental data structures and serve as the backbone for many other data structures and algorithms. They allow you to store and manage multiple values of the same type in a contiguous block of memory, which makes access extremely fast using index-based lookup.
In this blog, we explored:
What arrays are and why they are needed.
Types of arrays: single-dimensional, multi-dimensional, and jagged arrays.
Array operations such as traversal, searching, sorting, copying, insertion, and deletion.
Advantages: simplicity, efficiency, and speed of access.
Disadvantages: fixed size, lack of flexibility, and limited built-in methods.
Internal working and memory allocation of arrays.
While arrays are efficient and lightweight, they fall short in real-world applications where we need dynamic resizing, flexible APIs, heterogeneous data handling, and powerful data structures. To overcome these drawbacks, Java introduced the Collections Framework, which provides dynamic and feature-rich alternatives like ArrayList, HashSet, and HashMap.